


How to Safely Add Speed to Your DEAD Drill and Reduce Side Bend
Sorry, you need to be a member to access to this video.
Become a member here!

Here's how to safely add speed to your DEAD Drill and reduce side bend in the golf swing to protect your back from injury. I highly recommend you read this study that discussing the demise of our younger pros who are destroying their backs before they're 40: https://thejns.org/spine/view/journals/j-neurosurg-spine/31/6/article-p914.xml?rskey=352qdv
Today, we're going to start talking about how to add speed to your drill. So obviously, as you know, with rotary swing, you start out, it's a very specific, simple step-by-step process, teach you how to rotate correctly in the backswing one, move for the transition and the post step. And then we start stacking the arms in, but at some point you've got to start adding speed to those things. At first, you've got to start slow, just like I've talked about millions of times. You don't go from the parking lot to the Indy 500. When you're learning how to drive a car, you have to go slow. So you can get the movements down, but we don't want to stay slow forever. But where people make the mistake is they go from the parking lot, learning how to drive that manual transmission and giving it just a little gas and slipped them a clutch out to wanting to go straight to the golf course, the next day, swinging full speed, hitting balls and expecting things to go well.
And of course, that just simply is not realistic. You couldn't do anything in life like that. It's like if I taught you how to play the piano, you'd, you're not gonna start out with Beethoven and Bach. You're gonna start out with Mary, had a little lamb or something, right? You have to learn the fundamentals, the chords, the progression, and then you start adding speed, rhythm and tempo. So today what I'm going to talk about is how to add speed. And so how to start looking for specific things that you're going to feel that will help you understand when you're going to create injury. Because as you start going from going really slow and watching yourself in the mirror and feeling these things, the feelings will change a lot as you start adding speed to them. And it's very, very important that you understand what to look out for and what to start feeling and paying attention to that can lead to injury because you're not going to get hurt going at this speed, right?
You may have the movement down, but the ball is not going to go very far, but as you start adding speed, that's when we start putting ourselves at risk for injury. And as you know, rotary swing is the only swing method out there. That's built entirely around preventing injury, as much as we can. Now, of course, it's impossible to prevent every injury one way to do that. It's just not move at all right, but we can do our best to make sure we understand the anatomy and the biomechanics and the underlying movement patterns that lead to injury. And I'm going to talk about one of those huge ones today that I think in my personal opinion is the number one thing that's being taught incorrectly by almost every golf instructor on the planet today. And it's leading to a massive amount of injuries on the PGA tour.
As you know, I've talked about the national golf foundation many, many years ago showed that 81% of the tour pros miss on average nine weeks for a golf swing related injury. Think about that more than four out of five tour pros. These are guys supposed to be the best swings in the world, right? Nine weeks they miss on average for a golf swing related injury. Now, to me, that's insane. I don't think people in the NFL have that high of an injury rate to miss that missing almost a whole season or half the season. So it's crazy that golfers get injured this badly and it's all preventable. And I'm going to show you one of the key things again, that I'm going to talk about today. That's going to help you understand how to prevent this injury yourself so that you don't end up like Rory McIlroy rib injury tiger woods with a back injury, just Cameron champs with a back injury Jason Day, talking about retiring at age 40.
This stuff is crazy. The champion store's going to start at age 35. If we keep teaching the golf swing the wrong way. So let's first talk about adding speed. At first, you work through the drills systematically. And so you may be at the point where you're, you've got the club in, your you're able to get through the whole thing gets your impact position. And you may even be going kind of slow and letting the club release what I want you to do at first, when you start adding speed at the very beginning is throw the club down because what I want you to do is be able to feel stuff in your core, your legs, your hips, your trunk, your core, so that you start to feel those first without the extra distractions of your arms, stretching the muscles in your shoulder, loading the weight in the momentum of the club.
I want you to feel your body first cause this, this is the engine of the golf swing. And not only do you have to use it correctly to add efficient speed, but you have to do it correctly to keep yourself from getting hurt. And that is my top priority. So at first, just go back to the beginning, arms across the chest, take your set and go through your movement. This is how I might be doing it at a slow pace, checking myself in the mirror. And then I might be doing my transition at a similar pace, breaking them into chunks. And how do I take these three seemingly separate movements and make them start to blend into one? Well, first, what I'm going to do is take the first two movements, step one and two of the dead drill rotation going back and the transition.
And I'm going to try and piece those two together by themselves first, without a club, nothing else, not even with my arms out. So what I'm going to do at first, I need to pick up the pace of my backswing. If I don't do that, just go to the top and try to transition really quick. It's not going to work at all because I didn't load the muscles correctly in the backswing. Remember much of what you do in the downswing. And during the transition is a result of how you load it up correctly in the backseat or incorrectly if you're doing it wrong. Of course. So we need to make sure that we not only hit those positions by learning how to do them slow, but as we start doing them fast, you need to start to feel the muscles work differently. So first you may not feel a whole lot going really slow, but as I add speed, now I can start to feel my legs work.
And that's what I want you to focus on first, particularly your right glute, your right, but muscle here. I want you to feel that that has loaded as you go back. As I add pace to it, I can feel it. Yes, these muscles are stretching, but this is what I'm going to feel first. And then I'm going to start feeling my core cause my legs, the big muscles in my glutes, my hamstrings, my quads, and then my core all working together are going to make that transition automatic because as I moving this way, this side of my body is stretching. This side of my muscles, bodies are loading and that makes the transition wanting to get back to the left essentially automatic. So at first I want you to try to get the feeling of going a little bit quicker. The backs of even if you don't go to the downside just yet, if you're loading correctly in the backswing, what you should find is that you naturally want to shift back over to the left or in the transition.
That's what I want you to feel. You have to be really, really careful as we start adding this and getting to the post-it move to understanding the difference in pushing versus pulling, which I'll talk about in a second, because this is the way that you're going to destroy your lower back. So first I feel my leg I've got really stable. I can really learn, turn into this leg and load up everything really assertively so that I automatically want to sit back into that left side and move my weight back to the left. Now you'll notice that I'm not driving hard off the right leg. I've talked a lot about that and I'm not turning my shoulders at all. It's the exact same movements just with pace. So as I feel going a little bit faster and maybe at first, I may only go 20% faster than my normal speed.
So let's say this might be my practice speed, where I'm breaking it into chunks. And now let's add 20% or maybe 30%. And keep trying to challenge yourself to go a little bit faster until you feel these muscles dynamically load and allow you to shift back over to the left side, all this kind of one congruent motion, then what I want to do, assuming I'm doing it correctly at that speed. And don't think that you have to go full speed. You don't have to go to a hundred percent right away. You may only be going 50% and getting your transition. That's great. We've made progress, right? We've gone from slow and doing the movements, correct. Now, adding a little pace to it. And now what I want to try and do is put all three of the core dead drill moves together, the backswing transition and post up all together.
As one at first, I may break this into two steps with one chunk. What I mean by that is backswing and transition. Those two go together pretty easy. And I may have to stop. If I'm used to driving off this right side or turning my shoulders, I may have to stop during the transition. Make sure that this is good and then try to do the post up move. What I want to try and do is blend all three of those together with pace. So let's see what that would look like. So you can set up backswing and I'd say this has maybe 50% speed
All
Starting to happen automatically. Now I may start to make mistakes here. If I go too fast too soon, and I may start doing this, what did I do wrong here? Well, turn my shoulders here. Right? I may go back and shift and not turn. So just pay attention to the mirror, video self, doing these movements, adding a little bit of pace time and just go in small increments, go a bit faster each time. Try to go a little bit quicker and make sure you load it and post post-it load up and post it. Now, when we start talking about injury, this is where it starts to happen. Most of the golf swing related injuries either happen around the impact area or into the follow-through. That's when the loads are the highest and the bodies in the most vulnerable positions. So it's really important. I want you to understand and feel one specific thing.
If you have low back issues really listen up because this is a really, really important thing that I want you to understand, to prevent injury. A lot of times golfers are taught and this belief is still held that the faster you turn your hips, the further you can hit the ball. And there is some truth to that. Believe it or not assume everything is working able to keep up with that. There is truth to that to a degree, but you don't have to move your hips blindingly fast. Like you see so many young tour pros today. Davis love is a great example of that, right? David's love is still one of the longest hitters out there on the tour. And he's on the champions tour. He still swings on 120 miles an hour, and certainly his hips are not the fastest in the world. So understand that this idea of turning your hips as fast as you can, tends to lead to two things.
One, it leads to pushing from the right side or the trail side. If you're going to drive your hips and try to turn them open, as far as you can. First of all, I vehemently don't recommend that you do this, but if you're going to do it, understand that you're going to do that by pushing from the right side, the trail side. That's how you're going to build a turn your hips. Not only more open, but turn them faster. When you start doing this, inevitably, as you get better, it's not going to be just your legs that are doing it. That'll be part of it, but you're going to start to use your core as you become better. And you're going to start to use this right side or trail sido bleak. And this, in my opinion is the best way to herniate your disc in your back and blow out your lower back.
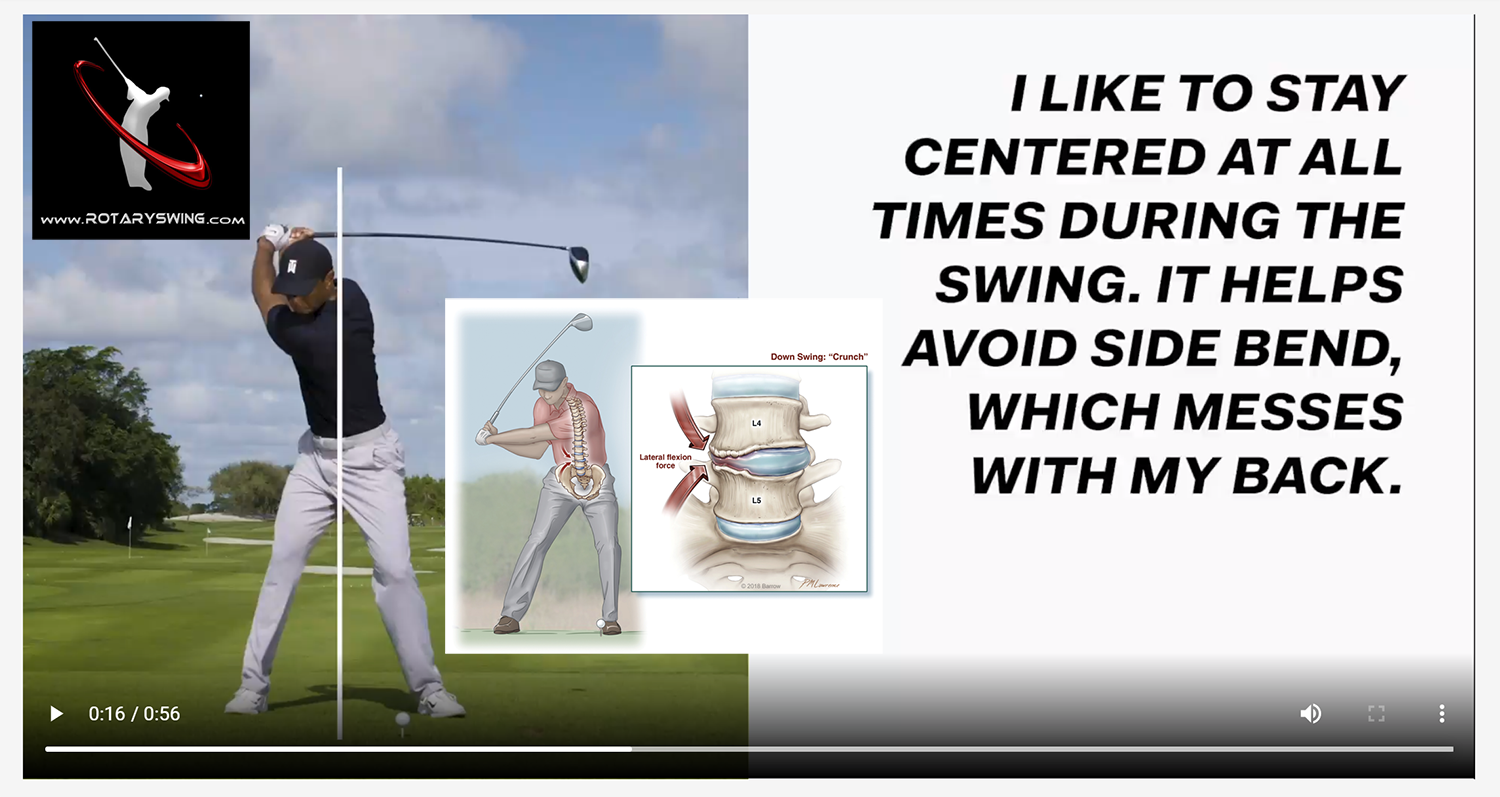
So if you're doing this incorrectly, I want you to start to feel this muscle right here and pay a close attention is what I'm doing here. If I'm driving my hips open, as far as I can, two things are gonna happen. When I start driving with my oblique one, I'm going to introduce side bend. This is easy to see from down the line. So many players say, instructors are teaching you to get your ear down to the ground and get as much side bend as you can. And in my opinion, it's the dumbest worst thing that you can do for your body in the golf swing. Here's what happens as you start pushing from this trail side, this oblique contracts as this muscle runs up your rib cage and attaches in your pelvis. This pulls the shoulder down. So my shoulders are nice and steep, but it also pulls your pelvis up.
So now I've compressed all of the space in my lumbar, the place where people hurt their backs all the freaking time. If you want to herniate your disc, push as hard as you can from the right side. If you do this and you can track this righto bleak, it pulls the hip forward and up, pulls the side and shoulder down. And now you've got these super steep shoulders and just keep doing that over and over again, thousands and thousands of times and see what happens. I don't think there's any dispute there as to what's happening on the tour. There's so many guys that are being taught to do this, to rip their hips open, drive them open as far as they can carry as much side men as they can. And then we wonder why everybody's getting injured all the time. It's not rocket science people.
So to avoid doing that, understand that if you pull from the lead side, that you can keep this space open, the more that you can track this righto bleak by trying to push to turn your hips as fast as you can and get your shoulder steep, the more pain you're going to experience, and you may get away with it for a while, especially if you're a youngster and you're really flexible, really fit really strong in your core. As you get older, you got to pay the Piper sometime. So let's avoid doing that and learn how to move quickly and use leverage in the swing without having to hurt our backs in the process. Because to me, golf should be a game that we should be able to play for a lifetime. And I truly truly believe that and everything I do, everything I teach is built around that concept.
And you guys know if anybody's had spine injuries, I'm your guy. I've had four spine, cervical spine surgeries. I have scoliosis as a result. I'm fused at C1 two and three. After breaking my neck, I had a C one burst fracture. Very few people survive that I'm very lucky to not be on a ventilator or on a wheelchair or to even be I'm lucky to be alive today. So protecting the spine. It's a big deal to me. So for my students, I want you guys to be able to play as long as you can learn how to add speed the right way. You don't have to be driving your hips open. And in fact, you've heard me talk a lot about how we'll use this right heel. It can roll to the inside as you shift laterally. But as soon as you let this he'll come up, that's what allows your hips to turn more, the more rotation that you create inside bin, the higher, the risk for blowing out your back.
It's that simple. Keep the heel down that it rolled to the inside. Your hips can't turn any further than this. I'm going to bring my hips any further. So automatically act as a breaking mechanism to keep your hips from getting too open. So as you're working on adding speed, keep that heel down. It's okay if it comes up a little bit, but be very, very careful with this. I really like to see people just let it roll to the inside a little bit, especially while you're learning, because then it means you're not pushing off of this right foot contracting this right oblique and pulling yourself into this very steep shoulder position. So now once you've got the basic ideas of adding a little bit of speed at a time, you can start stacking pieces in. You can stack the club in. At first, he might just go lead arm only. This is again, step four of the dead drill, rotate back,
Add a little speed to
The club. Now everything's going to feel a little bit slower because now we've got this big clubs swing, this big arch around us. So now I'm going to turn back and let the club release. At some point, obviously my heel has to come up off the ground. I want to keep it there forever, but when you're going lead arm only you, we can keep it down really, really a long time, but you don't need to exaggerate that. So now we're just focusing again on what we felt when we're doing this. We want to feel the same thing when we're adding the club. And we, if you're at the point where you've added the trail arm, you do the same thing. You rotate into that right leg transition. Let the club pull you around to follow through. That's the efficient way to swing, protect your body.
Protect yourself from side bend, minimize side bend. In fact, a recent article in golf digest was showing tiger woods in his swing. And he literally said, he's trying to avoid. Sideband the very thing that many instructors are teaching out there to do. He's trying to avoid side bend and minimize side. Then as much as he can to protect his back. But unfortunately in Tiger's case, it's a little too little, too little too late. But for you, if you haven't blown out your back yet, we can protect you. We can save you from having to go through all these traumatic surgeries and protect yourself so you can play golf for a lifetime pain free. So again, add speed slowly. So I like to do it in like 10, 20% increments. As long as the movements don't break down, keep adding a little more speed, a little more speed again, group it in patterns.
So you go move one and two together, move one, two and three together, one, two and three with the arm together, one, two and three with the club together. And so on. You're just always doing movements. One, two, and three. That's the whole golf swing. If you can do these three movements at speed, you're off to the races, baby. This is it. So hold off something that is the dead drill. It's the drill to end all drills. You have one drill to learn, learn how to do it with speed. Slowly, challenge yourself to add a little bit more each time and you will be able to play pain-free golf, hit the ball further, more consistent with less effort than you ever thought possible.

Ron
Craig (Certified RST Instructor)
Ron
Craig (Certified RST Instructor)
Kevin
Craig (Certified RST Instructor)
Kevin
Alejandro
Craig (Certified RST Instructor)
Bernie
Craig (Certified RST Instructor)
Martin
Craig (Certified RST Instructor)