Want to feel this in YOUR swing?Try a free AI-powered golf lesson → — GOATY gives you real-time voice coaching, pose tracking, and instant feedback on every rep.
A great deal has been written about the importance of a proper golf grip over the years. Ben Hogan devoted 17 pages to the subject in his landmark book "Five Fundamentals," which led many golfers to believe the grip is some magical, mystical secret of the golf swing. But after years of teaching countless golfers, I have learned two important truths.
Stop reading about it — feel it in your swing today
GOATY watches your swing live and coaches you between every rep. Free. No signup.
First, grips come in all shapes and sizes and can still be effective. And second, there is an ideal way to grip the golf club based on biomechanics and human anatomy, and it is surprisingly easy to learn. In this video, I demonstrate the details of how to grip the golf club so that the hands work together seamlessly as a unit, regardless of your golf swing type.
From that solid foundation, you can make minor adjustments to your golf grip to match what works best for your swing and desired ball flight.
How to Grip the Golf Club
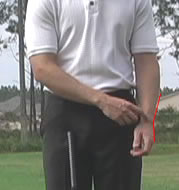
To begin learning a proper golf grip, stand with your hands hanging naturally at your sides and observe how, when completely relaxed, your hands maintain a slight cupping at the wrist joint. This is the natural resting position for the wrist and should be maintained throughout the entire process of establishing your grip.
Next, notice how when you bring your arm across your body, it rotates slightly, creating the appearance that the cupping increases — though it does not actually change significantly.
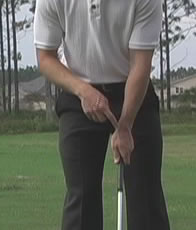
As you bring your trail hand in from underneath and across your body, the lead thumb will sit in the lifeline of the trail hand. You should feel very snug and secure, and be able to hold a tee between the thumb and forefinger of each hand without generating any tension.
Where Should the "V's" Point?
You want the "V's" formed by the thumb and forefinger on each hand to point toward your trail ear and shoulder. If they point more toward the center or lead side, that is considered a weaker grip and will typically require the golfer to rotate the forearms more aggressively through impact to square the clubface.
A grip where the V's point more toward the trail shoulder is considered a stronger grip and can lead to hooking problems when combined with a golfer who likes to aggressively release the hands and clubface through impact. Start with a neutral grip and adjust from there.
Weak to neutral grip
The most important thing about your golf grip is that it should feel like a day of perfect weather — you simply do not notice it. If you find yourself constantly fiddling with your grip or feeling uncomfortable, keep a club nearby and practice gripping it at least 20 times a day for a couple of weeks to adjust to your new grip. To see how your grip and overall swing mechanics affect your scores, try a free AI swing analysis.
{josociallocker}
The Grip Video Transcription
The golf grip is one of the most important and frequently overlooked fundamentals of the golf swing. In this video I am going to walk through, step by step, how to take a proper grip, starting first with the lead hand and then with the trail hand.
I am also going to explain how having your grip positioned differently than what I describe will affect your swing mechanics and ball flight — not necessarily right or wrong, but I will show you the specific tendencies you are likely to develop.
Let us start with the lead hand — getting the lead hand on the grip properly. I am going to discuss the muscles you will engage, how the club needs to align, and what issues you may encounter. Let us take a close look at the lead hand.
Strong grip
When examining the lead hand, the most common mistake I observe is golfers who take the grip in a very weak position. When we say "weak," we are looking at the line formed by the thumb and forefinger — this little "V" as it is commonly referred to — and noting what direction it points, or how many knuckles on the lead hand you can see.
You can see here, if I take this line and have it pointing up more toward the center of my body and you can only see perhaps one knuckle, that is considered a weak or possibly neutral grip, depending on who defines it.
More or less, this is going to be a very common grip position that makes it extremely difficult for you to square the club face coming into impact. You will notice that I can see a lot of the butt of the club from this angle. You never want to be able to see the butt of the club when viewed face on. It should be covered by the meaty pad of your lead hand.
The V points to the right ear (above) and beyond the right shoulder (below)
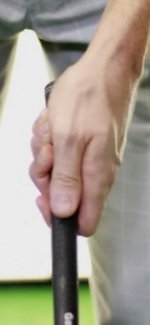
Let us examine what the different positions look like. We will define strong and weak here. This would be a very strong grip. Notice that the end of the grip is now hidden — you cannot see it from face on, and there is a small crease between the two tendons where you can fit your finger. That crease is now positioned to the trail side of the center of the shaft.
This is weak — this little gap is positioned to the lead side. In an ideal world, you want to set that pad pretty much over the center or just to the trail side of center of the shaft. That is a reliable way to check your position. Notice that from your perspective, you should not be able to see much of the butt of the club.
With a weak grip you can see a lot; with a strong grip you cannot see any at all. There are advantages and disadvantages to each, which I will cover in a moment.
For now, in an ideal scenario, we want to be just slightly stronger than neutral. A practical way to gauge this is to take the V formed by the thumb and forefinger and get it to point approximately toward your trail ear, assuming you are a right-handed golfer. This V is pointing up toward my trail ear.
Grip strength comes from the last three fingers
This other position would be pointing well beyond my trail shoulder. You can see I can see a lot of knuckles — perhaps all four knuckles in this view.
About two and a half knuckles visible is a good general reference point. The critical factor — the true definition of where you want to be in terms of grip strength — is how you actually grip the club. This is extremely important.
If I were to demonstrate how you should properly grip the club, you could do it more or less with your thumb and forefinger off the club entirely. In other words, the majority of your gripping strength comes from the last three fingers, which activates the flexor muscles in your forearm. That is where the majority of your grip strength originates.
You should be able to hold the club quite securely with just these three fingers. If you are relying heavily on the thumb and you notice a significant wear spot where the thumb contacts the shaft, you are creating all kinds of problems.
Thumb & forefinger pinch together
Typically, you will develop this wear pattern at impact and during the transition if you are using your thumb too aggressively, and you risk injuring the tendon in your thumb. Your thumb should remain relatively relaxed on the club. Most of your grip pressure should come from those last three fingers.
You do not need to hold the club tightly at all. On a scale of 1-10, you could say 2-4 at the high end, with the thumb and forefinger pinched together to prevent the club from slipping at the top of your swing.
If your thumb and forefinger are gapped apart, the club can start to "fall" out as you reach the top of your backswing. When golfers complain about having to re-grip the club during the swing, 9 times out of 10 it is because they do not have the thumb and forefinger properly pinched together.
With the thumb and forefinger together, as you can see here, when I reach the top of the swing the thumb can support the shaft without requiring me to grip the club tightly with my fingers.
Match the right hand up with the left
Get the pad positioned over the top of the shaft, at the center of the shaft. That will align the small gap close to the center. This placement gives you significant leverage on the club. You should notice about 2-2.5 knuckles visible, and there should be a slight natural cupping in your lead wrist. Thumb and forefinger pinched together. Thumb and forefinger are light on the club. The majority of your gripping strength comes from the last three fingers.
In a moment I will explain what "strong" versus "weak" will do for your hand, but for now those are the essential points you need to know.
Now with the trail hand, as we bring it in, we simply want to match it up with the lead hand. In other words, the thumb and forefinger on the trail hand are now going to be parallel to the thumb and forefinger on the lead hand.
Adding the right hand
You will see that this line runs basically right up through the center of my forearm and up to my trail shoulder. Because the lines are parallel, the trail hand V will point slightly more to the trail side than the lead hand V, which points toward the trail ear. The trail hand line extends a bit further in the same direction because they are parallel to each other.
The other important detail is that the trail hand should grip the club a little more in the fingers. The lead hand will have a bit more palm contact on the grip, while the trail hand sits more in the fingers. If you look closely, you can see how the club sits right through the crease at the first knuckle. It sits just like that.
I will move the lead hand out of the way. There. Again, thumb and forefinger are light on the club. My lead thumb sits nicely in the lifeline of my trail hand. You can see how they mesh together really well.
As I bring that hand on, it goes right like that. The knuckle of my lead thumb is sitting up in the lifeline of my trail hand. The trail hand simply comes across, and that is it.
Separation of the "trigger" finger
Again, thumb and forefinger need to be pinched together because if you reach the top of the swing and hold the club loosely, the club will slip right through your hands. You will have zero control over the club face. It is critically important that those two fingers are pinched together.
Whether or not there is separation at the forefinger — which is something you see frequently, as many golfers call their trail forefinger the "trigger finger" and want to push against the shaft — you really do not need to do that. In fact, it will cause significant problems. It makes it very easy for the average amateur to flip the club through impact if you are pushing against the shaft with that forefinger.
Whether or not you have slight separation at the forefinger is not a major concern. What is far more important is that you grip the club primarily with the middle two fingers of your trail hand and the last three fingers of your lead hand, and avoid gripping it tightly with the thumb and forefinger on the trail hand.
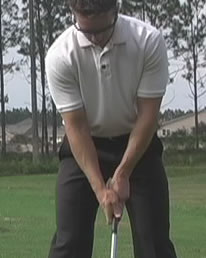
Hands ahead of the ball at impact
That is it. That is all it takes to establish a proper golf grip. Now, you can encounter numerous problems if you do not have this type of grip. I am going to cover the most common issues I see and discuss the pros and cons of each.
One common issue is having a really strong grip. Going back to the lead hand, with the trail hand in a very strong position as well, this setup allows you to have your hands well ahead of the ball at impact while still having the club face square. The consequence is that it will dramatically de-loft the golf club, and you are going to hit the ball very, very low.
That is not necessarily a bad thing if low trajectory is your goal. However, if you do not maintain much shaft lean at impact and you are the type of golfer who loses lag, a really strong grip will cause you to hit the ball hard to the left. Again, a neutral or slightly stronger than neutral grip is what we recommend for most golfers.
A few degrees of shaft lean
The opposite scenario is a really weak grip. Now you can see the thumb and forefinger on my trail hand pointing over to the lead side of my head. This grip will require significant hand manipulation coming into the ball in order to square the club face — not ideal.
Again, slightly stronger than neutral is the ideal starting point. It allows you to achieve a few degrees of shaft lean at impact — all you need. You can have four or five degrees, up to eight degrees of shaft lean depending on the trajectory you are looking for, and still have the club face square without having to manipulate it with your hands.
If you go stronger than that, you can get your hands much further ahead at impact and still have the club face square. If you go weaker, your hands are going to tend to be more in line with the ball, because if you get your hands well ahead of the ball with a weak grip, the face will be wide open.
Hands are not equal on the club
Simply go through the sequence of establishing a proper golf grip on the club and you will not have anything to worry about. When changing your grip, just keep a club nearby for a couple of weeks. It will not take long — keep re-gripping until you feel comfortable with the new position. For a data-driven look at how your grip and swing mechanics are performing, try a free AI golf lesson that evaluates your form in real time.
The final important point is to make sure that both hands are on the club with equal engagement. I frequently see golfers who come in for lessons with their lead hand gripping the club very tightly while the trail hand barely holds on. I know immediately that they are not going to be able to use the trail side of their body effectively if the trail hand is not properly on the club.
Using the trail hand for the Throw the Ball Drill and similar exercises is completely taken out of the equation if the lead hand is cinched down so tightly that the knuckles are turning white.
Make sure both hands are on the club securely. You need to use both in the golf swing. Work through this grip sequence, and you will be able to start hitting the ball much more consistently with significantly less effort trying to manipulate the club face with your hands.
Checkpoints for Practice
In a "strong" grip, the V of the lead thumb points beyond the trail shoulder - a "weak" grip points to the center of the body
Neutral to slightly strong is the preferred grip for most golfers
The pad of the lead hand & space between the tendons at the base of the lead thumb should both be about at the center of the shaft
Most of the force is exerted with the back three fingers - thumb and forefinger are light on the club, but pinch together to prevent the shaft slipping through at the top
The trail hand matches up to the lead - the V of the trail thumb parallels the V of the lead
The lead thumb nestles into the lifeline on the trail hand
The hands should grip the club securely - don't let the lead do all the work
The golf grip is one of the most important and frequently overlooked fundamentals of the golf swing. In this video I am going to walk through, step by step, how to take a proper grip, starting first with the lead hand and then with the trail hand.
I am also going to explain how having your grip positioned differently than what I describe will affect your swing mechanics and ball flight — not necessarily right or wrong, but I will show you the specific tendencies you are likely to develop.
Let us start with the lead hand — getting the lead hand on the grip properly. I am going to discuss the muscles you will engage, how the club needs to align, and what issues you may encounter. Let us take a close look at the lead hand.
When examining the lead hand, the most common mistake I observe is golfers who take the grip in a very weak position. When we say "weak," we are looking at the line formed by the thumb and forefinger — this little "V" as it is commonly referred to — and noting what direction it points, or how many knuckles on the lead hand you can see.
Strong grip
You can see here, if I take this line and have it pointing up more toward the center of my body and you can only see perhaps one knuckle, that is considered a weak or possibly neutral grip, depending on who defines it.
More or less, this is going to be a very common grip position that makes it extremely difficult for you to square the club face coming into impact. You will notice that I can see a lot of the butt of the club from this angle. You never want to be able to see the butt of the club when viewed face on. It should be covered by the meaty pad of your lead hand.
Let us examine what the different positions look like. We will define strong and weak here. This would be a very strong grip. Notice that the end of the grip is now hidden — you cannot see it from face on, and there is a small crease between the two tendons where you can fit your finger. That crease is now positioned to the trail side of the center of the shaft.
The V points to the right ear (above) and beyond the right shoulder (below)
This is weak — this little gap is positioned to the lead side. In an ideal world, you want to set that pad pretty much over the center or just to the trail side of center of the shaft. That is a reliable way to check your position. Notice that from your perspective, you should not be able to see much of the butt of the club.
With a weak grip you can see a lot; with a strong grip you cannot see any at all. There are advantages and disadvantages to each, which I will cover in a moment.
For now, in an ideal scenario, we want to be just slightly stronger than neutral. A practical way to gauge this is to take the V formed by the thumb and forefinger and get it to point approximately toward your trail ear, assuming you are a right-handed golfer. This V is pointing up toward my trail ear.
Grip strength comes from the last three fingers
This other position would be pointing well beyond my trail shoulder. You can see I can see a lot of knuckles — perhaps all four knuckles in this view.
About two and a half knuckles visible is a good general reference point. The critical factor — the true definition of where you want to be in terms of grip strength — is how you actually grip the club. This is extremely important.
If I were to demonstrate how you should properly grip the club, you could do it more or less with your thumb and forefinger off the club entirely. In other words, the majority of your gripping strength comes from the last three fingers, which activates the flexor muscles in your forearm. That is where the majority of your grip strength originates.
You should be able to hold the club quite securely with just these three fingers. If you are relying heavily on the thumb and you notice a significant wear spot where the thumb contacts the shaft, you are creating all kinds of problems.
Thumb & forefinger pinch together
Typically, you will develop this wear pattern at impact and during the transition if you are using your thumb too aggressively, and you risk injuring the tendon in your thumb. Your thumb should remain relatively relaxed on the club. Most of your grip pressure should come from those last three fingers.
You do not need to hold the club tightly at all. On a scale of 1-10, you could say 2-4 at the high end, with the thumb and forefinger pinched together to prevent the club from slipping at the top of your swing.
If your thumb and forefinger are gapped apart, the club can start to "fall" out as you reach the top of your backswing. When golfers complain about having to re-grip the club during the swing, 9 times out of 10 it is because they do not have the thumb and forefinger properly pinched together.
With the thumb and forefinger together, as you can see here, when I reach the top of the swing the thumb can support the shaft without requiring me to grip the club tightly with my fingers.
Get the pad positioned over the top of the shaft, at the center of the shaft. That will align the small gap close to the center. This placement gives you significant leverage on the club. You should notice about 2-2.5 knuckles visible, and there should be a slight natural cupping in your lead wrist. Thumb and forefinger pinched together. Thumb and forefinger are light on the club. The majority of your gripping strength comes from the last three fingers.
Match the right hand up with the left
In a moment I will explain what "strong" versus "weak" will do for your hand, but for now those are the essential points you need to know.
Now with the trail hand, as we bring it in, we simply want to match it up with the lead hand. In other words, the thumb and forefinger on the trail hand are now going to be parallel to the thumb and forefinger on the lead hand.
You will see that this line runs basically right up through the center of my forearm and up to my trail shoulder. Because the lines are parallel, the trail hand V will point slightly more to the trail side than the lead hand V, which points toward the trail ear. The trail hand line extends a bit further in the same direction because they are parallel to each other.
Adding the right hand
The other important detail is that the trail hand should grip the club a little more in the fingers. The lead hand will have a bit more palm contact on the grip, while the trail hand sits more in the fingers. If you look closely, you can see how the club sits right through the crease at the first knuckle. It sits just like that.
I will move the lead hand out of the way. There. Again, thumb and forefinger are light on the club. My lead thumb sits nicely in the lifeline of my trail hand. You can see how they mesh together really well.
As I bring that hand on, it goes right like that. The knuckle of my lead thumb is sitting up in the lifeline of my trail hand. The trail hand simply comes across, and that is it.
Again, thumb and forefinger need to be pinched together because if you reach the top of the swing and hold the club loosely, the club will slip right through your hands. You will have zero control over the club face. It is critically important that those two fingers are pinched together.
Separation of the "trigger" finger
Whether or not there is separation at the forefinger — which is something you see frequently, as many golfers call their trail forefinger the "trigger finger" and want to push against the shaft — you really do not need to do that. In fact, it will cause significant problems. It makes it very easy for the average amateur to flip the club through impact if you are pushing against the shaft with that forefinger.
Whether or not you have slight separation at the forefinger is not a major concern. What is far more important is that you grip the club primarily with the middle two fingers of your trail hand and the last three fingers of your lead hand, and avoid gripping it tightly with the thumb and forefinger on the trail hand.
That is it. That is all it takes to establish a proper golf grip. Now, you can encounter numerous problems if you do not have this type of grip. I am going to cover the most common issues I see and discuss the pros and cons of each.
Hands ahead of the ball at impact
One common issue is having a really strong grip. Going back to the lead hand, with the trail hand in a very strong position as well, this setup allows you to have your hands well ahead of the ball at impact while still having the club face square. The consequence is that it will dramatically de-loft the golf club, and you are going to hit the ball very, very low.
That is not necessarily a bad thing if low trajectory is your goal. However, if you do not maintain much shaft lean at impact and you are the type of golfer who loses lag, a really strong grip will cause you to hit the ball hard to the left. Again, a neutral or slightly stronger than neutral grip is what we recommend for most golfers.
The opposite scenario is a really weak grip. Now you can see the thumb and forefinger on my trail hand pointing over to the lead side of my head. This grip will require significant hand manipulation coming into the ball in order to square the club face — not ideal.
A few degrees of shaft lean
Again, slightly stronger than neutral is the ideal starting point. It allows you to achieve a few degrees of shaft lean at impact — all you need. You can have four or five degrees, up to eight degrees of shaft lean depending on the trajectory you are looking for, and still have the club face square without having to manipulate it with your hands.
If you go stronger than that, you can get your hands much further ahead at impact and still have the club face square. If you go weaker, your hands are going to tend to be more in line with the ball, because if you get your hands well ahead of the ball with a weak grip, the face will be wide open.
Simply go through the sequence of establishing a proper golf grip on the club and you will not have anything to worry about. When changing your grip, just keep a club nearby for a couple of weeks. It will not take long — keep re-gripping until you feel comfortable with the new position.
Hands are not equal on the club
The final important point is to make sure that both hands are on the club with equal engagement. I frequently see golfers who come in for lessons with their lead hand gripping the club very tightly while the trail hand barely holds on. I know immediately that they are not going to be able to use the trail side of their body effectively if the trail hand is not properly on the club.
Using the trail hand for the Throw the Ball Drill and similar exercises is completely taken out of the equation if the lead hand is cinched down so tightly that the knuckles are turning white.
Make sure both hands are on the club securely. You need to use both in the golf swing. Work through this grip sequence, and you will be able to start hitting the ball much more consistently with significantly less effort trying to manipulate the club face with your hands.
{/josociallocker}
How to Grip a Golf Club
Learn the proper way to grip a golf club for improved swing and ball flight.
1
Stand Naturally
Begin by standing with your hands hanging naturally at your sides. Observe how your wrists maintain a slight cupping when relaxed, which is the ideal position to maintain while gripping the club.
2
Position Your Lead Hand
Bring your lead hand to the grip, ensuring that the thumb sits comfortably in the lifeline of your trail hand. This creates a snug fit, allowing you to hold a tee between your thumb and forefinger without tension.
3
Align the 'V's'
Check the 'V's' formed by your thumb and forefinger on both hands. They should point toward your trail ear and shoulder for a neutral grip. Adjusting their direction can affect your swing mechanics.
4
Practice Gripping
To get comfortable with your new grip, practice gripping the club at least 20 times a day for a couple of weeks. This will help you adjust and ensure that your grip feels natural during your swing.
5
Evaluate Your Grip
After practicing, assess how your grip feels. It should be comfortable and not distracting, similar to enjoying a perfect day. If you find yourself adjusting frequently, revisit your grip technique.
What is the significance of the 'V's' in a golf grip?
The 'V's' formed by the thumb and forefinger on each hand are crucial for determining the strength of your grip. Ideally, these 'V's' should point toward your trail ear and shoulder for a neutral grip. If they point toward the center or lead side, it indicates a weaker grip, which can lead to complications in squaring the clubface at impact.
How can I practice my golf grip effectively?
To practice your golf grip effectively, keep a club nearby and grip it at least 20 times a day for a couple of weeks. This repetition helps your hands adjust to the proper grip position, making it feel natural and comfortable, much like enjoying a perfect day of weather without any distractions.
What are the common mistakes golfers make with their grip?
One of the most common mistakes is taking the grip in a weak position, where the 'V' formed by the thumb and forefinger does not point correctly. This can lead to inconsistent ball flight and require excessive forearm rotation to square the clubface. Understanding the proper grip mechanics is essential for improving your swing.
Why is a neutral grip recommended for golfers?
A neutral grip is recommended because it allows for a more natural and consistent swing. It helps the hands work together as a unit, reducing tension and promoting a smoother release through impact. Starting with a neutral grip provides a solid foundation, from which minor adjustments can be made to suit individual swing styles and desired ball flight.
Learn the 3 Tour Pro Consistency Secrets You've NEVER Heard!
Watch part 2 now to see how you're moving your body in the opposite direction of the pros!
Get a Free AI Golf Lesson — 10 Minutes of Live CoachingJust prop up your phone, start swinging, and GOATY coaches you live with real-time voice feedback. No upload needed.
We're after one thing: Real Results - Real Fast.
And that's exactly what our members achieve.
And that's why they say the AXIOM is:
Mind-blowing. Game changing. Revolutionary.
RotarySwing was founded out of frustration with the current state of golf instruction. Quinton knew a better way had to exist to learn this game we all love.
The GOAT Code is finally ready after 3 decades of exhaustive work -
you can now learn how to play the game like Tiger and have incredible
control over the ball. This NEW program is truly a step-by-step process
that takes you from green to tee and will teach you the secrets of how
to play like the Greatest Of All Time. If you would like to switch over
to the new GOAT Code program, simply click the green button below.
Don't worry, you can easily switch back at any time and will see a new
button at the top of your screen to switch back whenever you like.
What are the main advantages of the new program?
It cuts down on the clutter - the videos you will see are all
you need to play your best golf ever - nothing more, nothing less
It is truly step-by-step - no more wondering what you should be
working on, the program guides you through every step of the way
Faster progress - you will see improvements in your scores incredibly
fast and this will immediately begin to spill over into your full swing,
even while working on just your putting!
There's a reason that Earl Woods taught Tiger how to play the game
from the green back.
I admit, at first, even I didn't think it was necessary. I thought I
could skip ahead and learn the full swing without building a solid
foundation in putting, chipping and pitching.
All this belief did was cost me MORE time than had I started
at the beginning just like The GOAT did. Over the past 20 years of
doing golf clinics, my observations of thousands of students was
always the same - those who started the slowest at the beginning
always got there the fasted in the end.
In other words, the students I observed being diligent with the
small things like grip, setup, posture and the basics of controlling
the clubface on day 1 were always WAY further ahead of those who
didn't on day 1.
In the post above by member Everett, he said it all in a nutshell.
Go through the program exactly the way it is laid out and you
will have extraordinary results. Skip to the end and you'll end up
with the exact same swing you started with.
This is a system, not a grouping of random tips.
There is a method to my madness deeply rooted in learning psychology
and over 30 years of teaching hundreds of thousands of golfers
just like you how to hit a ball with a stick. Slow down and you'll
get there faster...


 Weak to neutral grip
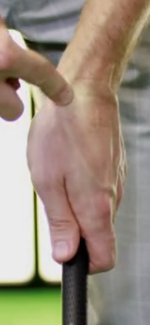 Strong grip
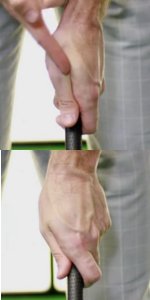 The V points to the right ear (above) and beyond the right shoulder (below)
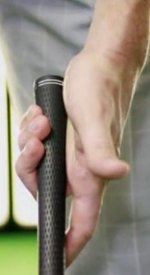 Grip strength comes from the last three fingers
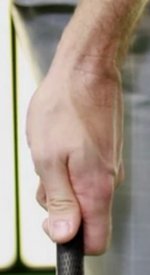 Thumb & forefinger pinch together
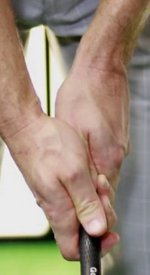 Match the right hand up with the left
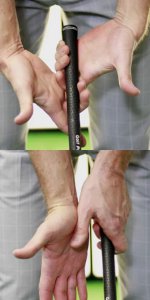 Adding the right hand
 Separation of the "trigger" finger
 Hands ahead of the ball at impact
 A few degrees of shaft lean
 Hands are not equal on the club