Watch part 2 now to see how you're moving your body in the opposite direction of the pros!
At last, a complete overview of the simplicity of the perfect golf swing, the Rotary Swing Tour - the perfect swing - from setup to the follow through.
This video presents a roadmap of the biomechanics of the perfect golf swing covering setup, takeaway, backswing, downswing and follow through. Each of the key checkpoints in the RST golf swing are covered and highlighted throughout the video filmed on the beautiful and famous first tee box at Castle Pines Golf Club in Colorado.
The perfect golf swing isn't born overnight. I have worked hard over two decades to put together the simplest, most powerful and efficient way to perfect the golf swing that is biomechaically ideal, and for the first time ever, you're going to see it all put together in one perfect golf swing video, enjoy!

Chuck Quinton, Castle Pines Teaching Professional, demonstrating the perfect follow through.
The perfect golf swing starts with an objective analysis. That involves a look at golf swing biomechanics, human anatomy, physics and ball flight and golf swing mechanics. One of the first pieces that myself and my team looked at was golf swing related injuries. Our golf medical panel is made up of mostly orthopedic surgeons and they provided incredible insights into the most common golf swing related injuries they operate on most frequently. I was surprised to hear that the most common swing related injury was left shoulder impingement for right handed golfers. Using this information, we worked to discover why this was such a common golf injury and this lead one of our doctors to invent the PostureTek shirt that teaches the golfer to be in perfect posture through a mechanical feedback device that vibrates like a cell phone!
This is just one example of our approach to building the perfect golf swing and ideal golf swing biomechanics. Injuries in golf are a big deal, so we looked at every aspect of the swing with this type of objective and in depth analysis. That anatomy and biomechanics formed the basis for the Rotary Swing, but we didn't stop there. We then looked at every aspect of the golf swing using 3D motion analysis through the help of TaylorMade Performance Labs and researched the ball/club interaction using our FlightScope X2 launch monitor.
Finally, having the perfect golf swing mechanics is completely useless without a learning system built around how the brain learns new movement patterns. The RST learning program forms the basis for learning the perfect golf swing, something you can do completely online using our proprietary online learning system built around Dan Coyle's eye opening book - The Talent code.
Once you are ready to learn the perfect golf swing, sign up for our FREE membership and get access to more than 2 hours of free instruction videos.
Check out the videos below to see what YOUR perfect swing is going to look like and start improving TODAY!
Video Transcription: Rotary Swing Tour Roadmap

Stance Width: 2" Outside Neutral
In this video we're going to do a complete overview of Moves 1-4 in the perfect golf swing, the Rotary Swing, and a little bit of the setup as well, just to give you a clear picture of the entire perfect biomechanical golf swing as an overview.
The first thing we're going to do is start out with setup. A lot of these things have been covered, so I'm not going to go into them as in-depth and detail as you will in some of the specific videos but we're going to give a complete, one-picture overview of the entire golf swing from beginning to end.
How to Perfect Your Golf Swing - Setup
First things first, it's incredibly important to make sure you're set up correctly to the golf ball. That's going to encompass a lot of things.
First things first, we talked about stance width. Again, this is going to be kind of a checklist of all the items so that, as you're working on your golf swing, you know what you're trying to accomplish. Two inches wider than the center of your hips, so two inches outside of neutral is your proper stance width.
Ball position, use the logo on your shirt as a rough guide. Basically, the bottom of your swing arc is the outside of your left shoulder here. That's the point in which the club is at its maximum extension. When you fully extend the club out, that's the point where the bottom of your divot is going to bottom out, so the ball needs to be slightly behind that. That's why we use the logo on the shirt as a rough guide. You can use the left side of your head, the left ear, also great guides.

Use axis tilt to move your right hand to the club
Once we get our stance width, the ball's off the logo of our shirt, put your left hand on the club first, and now we're going to talk about how we get the proper amount of axis tilt.
You don't want to take your hand and reach across your body like this, and you don't want to bring your right hand in and hike your left shoulder up. Your left shoulder's going to stay down in the box in neutral, and you're going to use your little bit of axis tilt to bring your right hand on the club. The biomechanics of the golf swing can be negatively impacted if you don't keep your spine in neutral as I'm demonstrating here.
Both Vs are pointing to the right side of the body. This is a little bit of a variable. I prefer a slightly weaker grip than some, but basically right towards the right ear, or right shoulder. I've got a little bit of axis tilt; the left side of my head is still on the back of the ball. From face on, those are the main checkpoints we're going to look for to setup for the perfect golf swing.
From down the line, if you recall we talked about hinging from the hips. That lets my hips drop back. My legs are still straight. My tummy's tucked in, and I'm in the box. Hinge from the hips, relax the knees so that the back of the knee joint is over the center of the ankle. Hinge, let my arms hang directly beneath my shoulders. Head up, chest up, belly in, and now I'm set up.

Setup viewed from down the line
Those are the key points there. One thing I failed to mention from face on is that once we get in this setup, you want to take those ankle joints, roll them slightly in to get us anchored to the ground.
Those are the primary checkpoints for a biomechanically sound golf swing setup.
Two, as we go into the takeaway now, we've got a couple of things to look at from face on and down the line. First off, as we start the club back, it's that two-inch shoulder blade glide that we talked about in the takeaway video. That's all I'm moving; hands and arms still in front of the chest.
Two-inch shoulder blade glide, push my right heel into the ground. You'll notice my hips shift just slightly to the right, so that I can load up into this right side for power in the golf swing. I have two checkpoints here; right heel, right glute. Once I shift, if I can feel it pushing my right heel in the ground and feel my right butt muscle, my right glute activate, I know that I'm loaded up far enough on this right side.

Right shoulder blade glide at takeaway
Right shoulder blade glide back, hands and arms do nothing, push my right heel into the ground, right glute activates. That's all you need to do for the golf swing takeaway.
To get to the top of the golf swing from there, right shoulder blade glide, right heel, right glute...now at this point we're going to have some more shoulder elevation. There's a small amount in Move 1, but we don't really focus on it for most golfers.
Shoulder blade glide, a little bit of shoulder elevation, keep pulling that shoulder back, hinge the right arm. That sequence; shoulder elevation, right elbow flexion, continue to pull the right shoulder blade back; shoulder elevation, right elbow flexion, pull the right shoulder back.
Now let's put those two together. Shoulder elevation, right elbow flexion, right shoulder blade glide. Now we put it together all in sequence...
There.
There will be some rotation in this upper right arm. Some golfers need to worry about it, some don't, but that arm is basically going to be rotated this way as you get to the top of the backswing. That's going to help keep the club on plane and keep you from getting too steep, but for the most part your key checkpoints: a little bit of shoulder elevation, right elbow flexion, pull the right shoulder blade back.

Shoulder elevation, right elbow flexion, right shoulder blade glide
The arms didn't swing across the body, they didn't go really high. It's a very small amount of shoulder elevation, from about the belt height to the bottom of your chest. It's maybe three to four inches for most golfers. You can have more, but there's no need for it.
Shoulder elevation, right elbow flexion, right shoulder blade glide. Done. Those are the key checkpoints in Move 2, to get to the top of the swing.
On the downswing, now what we need to do is focus on some different things. On the backswing we pulled everything with the right side, going back. Right arm, right shoulder blade, primarily the right oblique, right heel, right glute muscle.
On the downswing, it's the exact opposite. We're going to feel more the left side doing the work. From the top of the swing, the first move down - and I can't stress this enough - the first move down, shift your weight to your left side.
That's it. Nothing happens from the top, nothing happens with the arms, nothing happens with the club. Shift. Notice I didn't say, "Push off the right side." That's detrimental. Take your left leg and claw your weight back over. You can ruin a perfectly good golf swing by pushing too hard from the right side, so be mindful of this.
Now I'm pushing my left heel and left glute into the ground. By the time I get here, now I'm going to start to pull with that left oblique, now I'm right back at impact. From a golf swing biomechanics perspective, this will activate the correct stabilizer muscles in the hip area to give you the necessary stability at impact for control.
Let's do that in sequence.
There.

Weight has shifted at impact
Now I've primarily used the left side to bring the club down. It's primarily that weight shift. The weight shift alone will move the club to about there. Now as I start to pull with the left oblique, the club's to here.
Now, for those of you Rotary hitters out there, you can fire that right arm as hard as you want. For those of you who prefer more of a swinging motion, continue to pull with the left side; left lat, left arm, left shoulder, to pull the club back down into impact. You have the option of doing either.
My preference is to continue to pull with the left arm. Some people really like to use the right arm in the swing; that's fine. As long as it doesn't happen until right here, you can hit it as hard as you want. If you lack speed in your golf swing, biomechanics and basic physics are going to dictate that you're going to need to get some leverage from this right arm throwing motion.
Our primary checkpoints there, are we on the left heel? If you've started your force of movement from the top, you're going to take all of that energy and throw it out this way, and now you're going to see that my left heel is going to be up in the air. I see this every day.
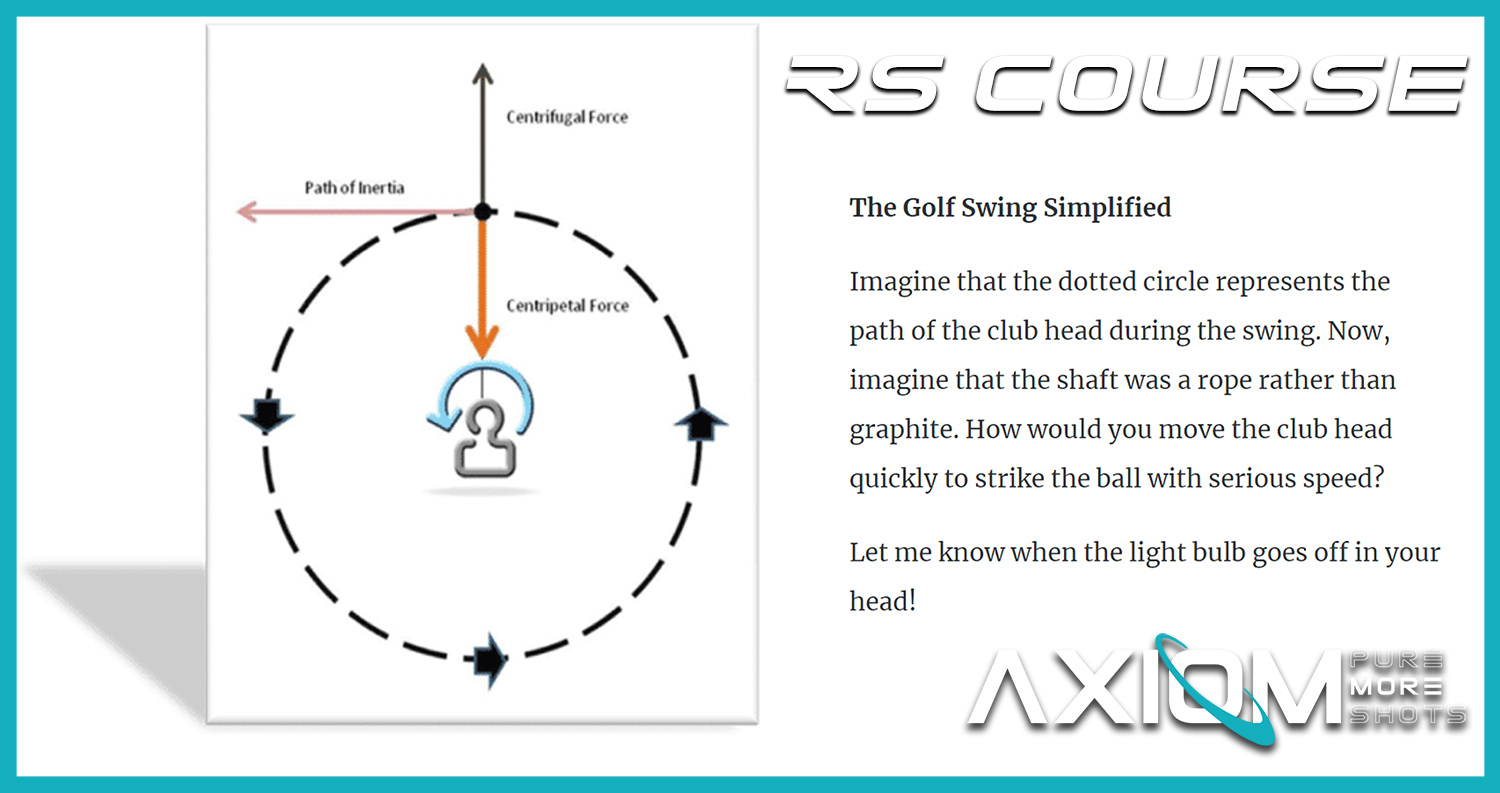
If you try to swing hard from the top, you're on the ball of your feet because you've got all this force going that way. You need to be moving in the opposite direction of the golf club at all times, so as you're coming down, if you want the club to go that way, you need to be moving that way.
Push the left heel in the ground, pull with the left oblique, continue to pull, keep your head down. At impact, we want to make sure that about 70-85 percent of your weight is on that left heel. Left heel, head still down, head behind the ball.
If you start pushing from the right shoulder, pushing from the right foot, you're going to run into all kinds of problems. Left heel, left oblique, then everything comes down. Continue to pull with the left side. That's impact for a perfect swing in golf.
Now the follow through, the key points we have here; continue to rotate, continue to pull with the left. Or if you've already hit, you're going to release it this way. Head stays down and back. This is important. If you start catching yourself hitting it thin, what we'll do is typically put a second ball down and make you keep your focus on that second ball into the follow through, and then let you come all the way around.

Follow through
The key point here is maintaining the spine angle can only happen when you continue to pull from that left side. So many golfers that we see lose their spine angle from the top, pushing off the right, their hips come into the ball and now they have to stand up out of the shot.
If I plant my left heel, pull with my left oblique, my spine angle has been maintained. Continue to pull. I can keep my spine angle long into the follow through, and then come up.
That's a complete overview the perfect biomechanical golf swing, all four moves plus setup to the Rotary Swing Tour. It's very, very small movements, but the key is they all need to be done correctly. You need to take the time to perform each one correctly.
Learning how to plant your weight onto your left heel, for some, takes a long time. Don't skip that step. Learning how to set up correctly; don't skip that step. It all happens in the proper sequence. You need to go through the hierarchy: setup first, weight transfer, Move 1, so on and so forth, so that you learn each piece individually.
Now you have a complete roadmap of where you're going with your golf swing.