


Matt Jones Golf Swing Analysis
Sorry, you need to be a member to access this video.
You Are Just Seconds Away - Become a member here!
Already a member? Log in now

In this video, I’ll show you 3 essential swing moves required for a consistent, on-plane swing. You’ll see a side-by-side swing comparison between PGA winner Matt Jones and RST founder Chuck Quinton to demonstrate the 3 moves and how swinging off plane requires unneeded compensations. Get the consistency you crave. Check out this video now to stay on plane!
- Focus on ingraining body movements to create a swing plane
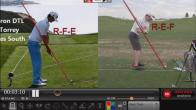
- REF = Rotation, Elevation, Flexion
- Prioritize the swing properly for consistent golf
Hey everyone, this is Rotary Swing Instructor Chris Tyler.
This week the Aussies are back at it again with a big victory at the Shell Houston Open.
Matt Jones gets a big victory over Matt Kuchar in a first hole playoff.
This week, I'm going to be talking about swing plane and three critical areas of the golf swing that we need to focus on in order to create a proper swing plane.
I'm also going to help get over a lot of the myths of instruction out there and help you build a consistent golf swing on your own.
So let's go ahead and get started.
Alright, so this week, when we take a look at Matt Jones golf swing, we're going to focus in on Swing plane.
And three of the critical areas.
That him and a lot of the other golf pros on tour really do, very, very well in order to achieve a consistent style of golf swing.
Now, that's one of the big things that a lot of people come to the website for is.
They're always trying to build consistency, and they're always trying to create efficiency.
And if we shift the focus away from what some of the poor instruction has really delivered over the past few years.
As far as aiming the golf club in certain directions and never really giving you the hows or whys, If we focus primarily on three really key movements within the body and ingrain those movements, then what we're going to do is we're going to be able to play consistent golf from one day to the next.
Ideally, if we focus on body movements alone, the golf club will consequentially move into a proper swing plane.
And that's one of the big ideas that I want to pass along is that swing plane is completely consequential to the movements that we create within the body.
Alright so we're going to focus on three really key areas this week.
It's going to be rotation, elevation and flexion.
You can see over here on the right hand side of the screen that I've written the acronym out and you're going to hear that acronym around the website rotation, elevation and flexion.
So that's what that means.
And those are the three really key areas that we need to spend some time.
And once you focus in on those, and you really ingrain those new movement patterns, you're going to be able to play a little bit more consistent golf.
So let's go ahead and take a look at Matt Jones golf swing and see some of the differences that he has.
But he still has a very good golf swing so I will start off by saying that.
So let's go ahead and take a look at Matt in relationship to the model swing here.
And let's get them both into the takeaway position.
Alright, so you can see here that Matt's golf club is tracing just a little bit underneath the plane line.
And you can also notice that he's pushed his left arm across his chest a little bit early on, which has caused his right arm to break.
And it's the reason why this club's a little bit flatter.
Now, if he were to continue creating all this momentum in the golf club, he's going to swing on a much flatter swing plane.
But he does make some adjustments in his backswing.
But I do want you to notice the commonalities here.
The commonality here is that he's created a good 45 degrees of shoulder turn, where in our model swing, he's also created a good 45 degrees of shoulder turn.
The club is tracing up this plane line.
Now, the only difference here is that Chuck has added a little bit of elevation here, rather than pushing the left arm across his chest.
Alright, so he's added that little bit of elevation to help create the width in the arc, and that's a big, big key ingredient as far as trying to create a proper swing plane of shoulder elevation.
There's a good video on the website in the backswing section called Understanding Shoulder Elevation.
So that'll really kind of clarify what proper shoulder elevation looks like.
And that's just a simple upward movement, Three to four inch upward movement of the arms.
That happens as a gradual process through the takeaway and in the backswing.
And it's also a variable.
So some people require more elevation that want to use the body less, and some people require less elevation.
That want to use the body a little bit more.
In the downswing and so on.
Alright, so that's really.
The only big difference here is that Matt has kind of pushed his left arm across his chest, which in turn has now, he's lacking a little bit of elevation.
He's a little bit on a flatter plane, but he's going to make some good moves here as he moves into the top part of his golf swing.
So you can see that the right arm is starting to flex and he's adding the elevation late.
Okay, so he's coupling the right arm flexion and the elevation, and in turn, you can see that he's still hit all three requirements.
And then got this club pretty much dead on plane.
So if I were to back him up, here just a couple of frames, you can see that that shaft is parallel to our plane line.
And then he just continues to rotate to the top part of the golf swing, so he's pretty much dead on plane.
So if we take a look at the model golf swing here in relationship, alright so we go up to the top part of the golf swing here we are.
You can see that.
The difference here is that Matt's hands and arms are a little bit deeper in relationship to his right shoulder, where Chuck's hands are right up over the right shoulder.
And his club is also on plane.
So because he didn't push the golf club back early with his left arm, he hasn't gotten the golf club as deep.
So now he's not going to have to work as hard and race the body and rotate the body to move the hands and arms back in front of him.
Where Matt is going to have to do that, he's going to have to make some sort of recovery style move.
And as far as if we look at the three key components here, alright so rotation, elevation and flexion, we've gotten good solid rotation out of Matt Jones, he's made a big wide turn.
He's got good flexion of the right elbow, he's got about 90 degrees, maybe even 95 degrees of flexion, still been able to keep the left arm nice and straight.
And then you can also see that his elbow is at the base of the peck.
And the same thing applies over here to Chuck on the model swing is that his elbow is right at the base of his peck.
He's got about 90 degrees of flexion and his elevation, you know, I'm sorry, his rotation is spot on.
So they both hit all three requirements in order to achieve swing plane.
One is just prioritized a little bit different.
And that's another way, like I said, That's how we're going to create.
Consistent golf is making sure that those three particular movement patterns are created so you can have this, So if we were to take Matt Jones down into impact, let's take a look here.
And because he had the hands and arms deep, as I said, He's going to have to work really hard with the body to get it out of the way, to make room for the hands and arms.
And you can see here that, let me get an arrow on the screen for us, you can see that his chest is open just a little bit more to the target.
You can see his chest is facing more out towards the target, where if I were to take Chuck down into the impact zone, all right, you can see that he is nice and square here where his shoulders are square, hips are open about 30 to 40 degrees.
All right.
So those are just reactions to the actual top part of the golf swing there.
And Matt has a great golf swing.
He's been able to take and build a consistent move.
And he's focused in on the three key areas that we spoke about here.
All right.
So if you want to get out there and you want to build a consistent golf swing, we need to shift the focus off trying to aim the golf club into certain areas.
We need to focus in on three very key movements.
And that's rotation, elevation, and flexion.
And there's a couple of good videos on the website.
I really want you to kind of go in order and make sure that you really ingrain those movement patterns first before you try to build this plane.
So if you were to go to five minutes to master rotation, take a look at that video.
Really kind of build a sound rotation.
And then go to five minutes to a perfect backswing checkpoints video.
We're going to outline the overall movements of elevation and flexion and help you get into a good spot with the hands and the arms.
Because the hands and the arm movements are very, very simple once you've learned elevation and flexion.
And then you couple that with rotation.
And there we go.
We're in a perfect swing plane position every time.
All right, guys.
So let's go ahead.
Let's put this to use.
Let's use these three key components to build a more consistent golf swing.
I look forward to working more with you guys in the future and I hope you have a great day.


Dave
Craig (Certified RST Instructor)
greg
greg
greg
Tim (Certified RST Instructor)
greg
Tim (Certified RST Instructor)
Tim (Certified RST Instructor)
greg
greg