


QuickStart Checkpoints
Sorry, you need to be a member to access this video.
You Are Just Seconds Away - Become a member here!
Already a member? Log in now


Ready to pass your first Checkout Swing Review? Here are the things your coach is going to be looking for in your swing.
At Rotary Swing, our only goal is to make you the best ball striker you can possibly be.
And in order to assure success, we have checkpoints that guarantee if you're hitting these checkpoints throughout your swing, that you're going to become a consistent ball striker.
Don't worry about remembering all of these or memorizing them because there's a list down below.
If you look below this video, you'll see a little tab that says checkpoints.
And in there, I've got a list where you can print them all out.
And so you don't have to memorize these.
But this video will give you a visual checkpoint, a visual reminder of what each of these checkpoints are.
So I'm going to start out with setup, and we're going to work through things step by step.
In the Quick Start program, We're not going to worry about getting every single little detail perfect, because what we're really trying to do is get you hitting the ball better immediately.
And so there's only a handful of things that you have to be doing to be a decent ball striker right away.
You don't have to spend months and months on work to be able to hit the ball properly.
We're going to slowly get you refined as you go through the program.
But at first, we can get you a huge win and start hitting the ball better right away just by hitting some very basic checkpoints.
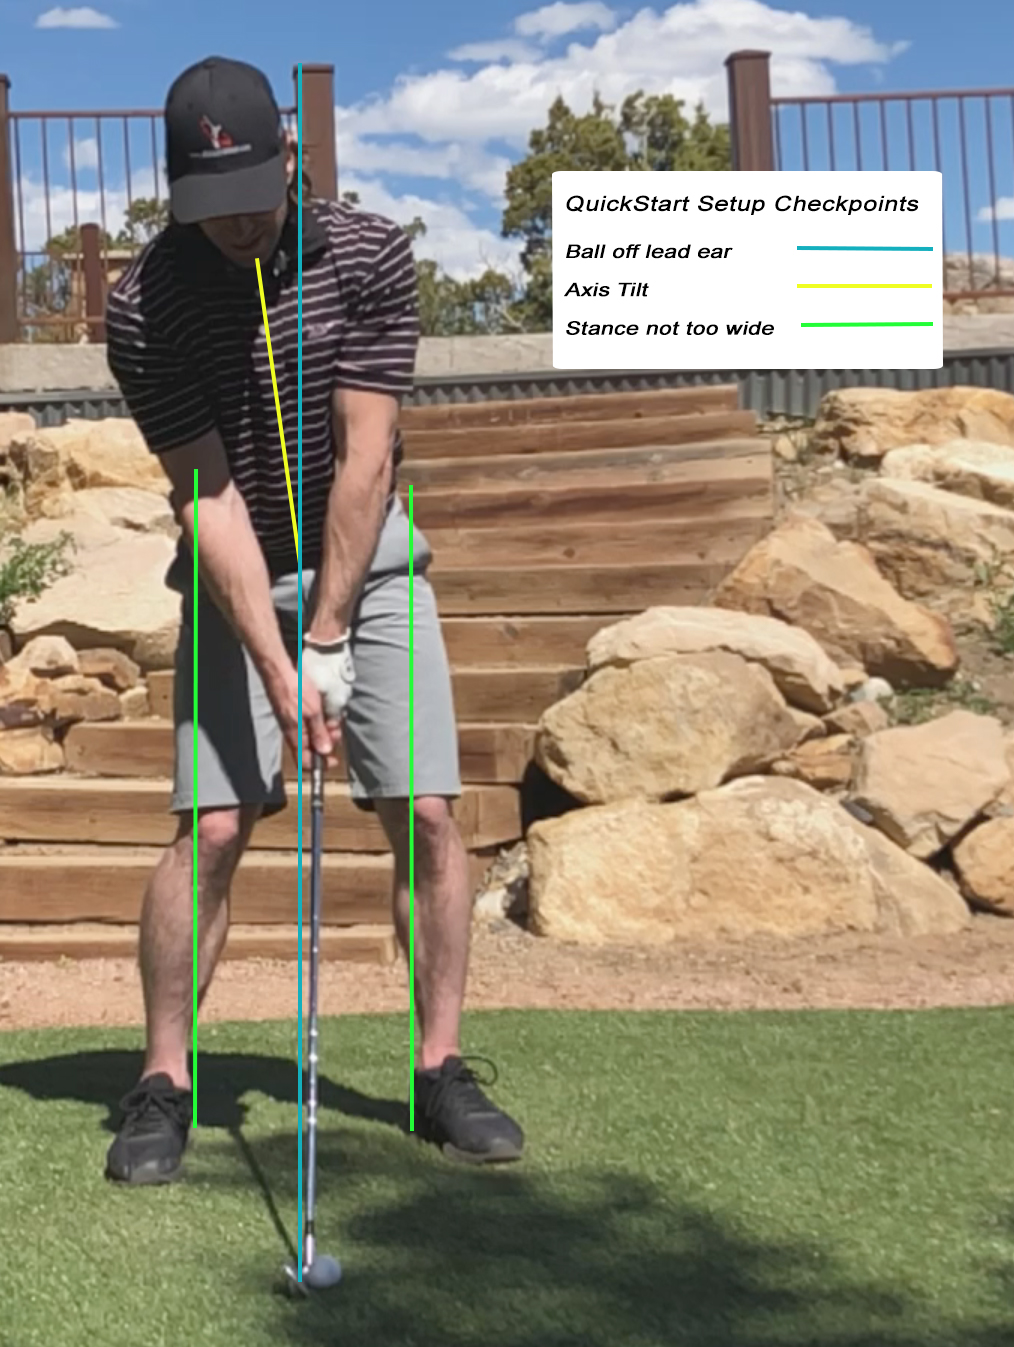
So with setup, these are pretty simple.
The main thing I want you to start to pay attention to is ball position.
So the ball is going to be basically off the back of your left ear, your lead ear.
So just hold a club up to your ear, drop it.
If that ball was give or take a ball width on that spot, you're good to go.
Where people tend to make a mistake because they have the ball way too far back in their stance.
So just use the lead ear as a good checkpoint.
The second thing, stance width.
If you stand too wide, transferring your pressure from one foot to the other is really hard without your head moving all over the place.
So find neutral and go a couple inches outside of that.
For many of you, this will be more narrow than what you're used to.
But trust me, as soon as you stop just swinging, trying to dominate everything with your arms and shoulders, this stance width will not only become more comfortable, but it'll be much easier for you to transfer your pressure back to the lead side, which will give you a lot more consistent strikes.
So once we have our stance width and ball position, and our weight distribution is going to be about 50-50 left to right, you can go, you can favor the left side a little bit with irons, but in general, just use 50-50 as a ballpark.
Find yourself getting comfortable here.
And most tour pros would be kind of 55 -60, 50-60 on the lead side with irons.
But again, use 50-50 as a guide.
We don't need to be perfectionistic about it.
The last thing is making sure you have at least a little bit of axis tilt to avoid reverse pivoting.
So a simple check for this, once you have your proper stance width, if you hold a club and hold it up so the toe is pointing back behind you, and you can just slide your hips to the left until that club hits you in the leg, then you're good to go.
That is enough axis tilt to keep you from reverse pivoting.
If you don't have any tilt or your worse lean negative axis tilt, you're almost always going to reverse pivot.
So if you hit those three checkpoints from face on with your setup, you're going to be good to go to start hitting the ball better right away.
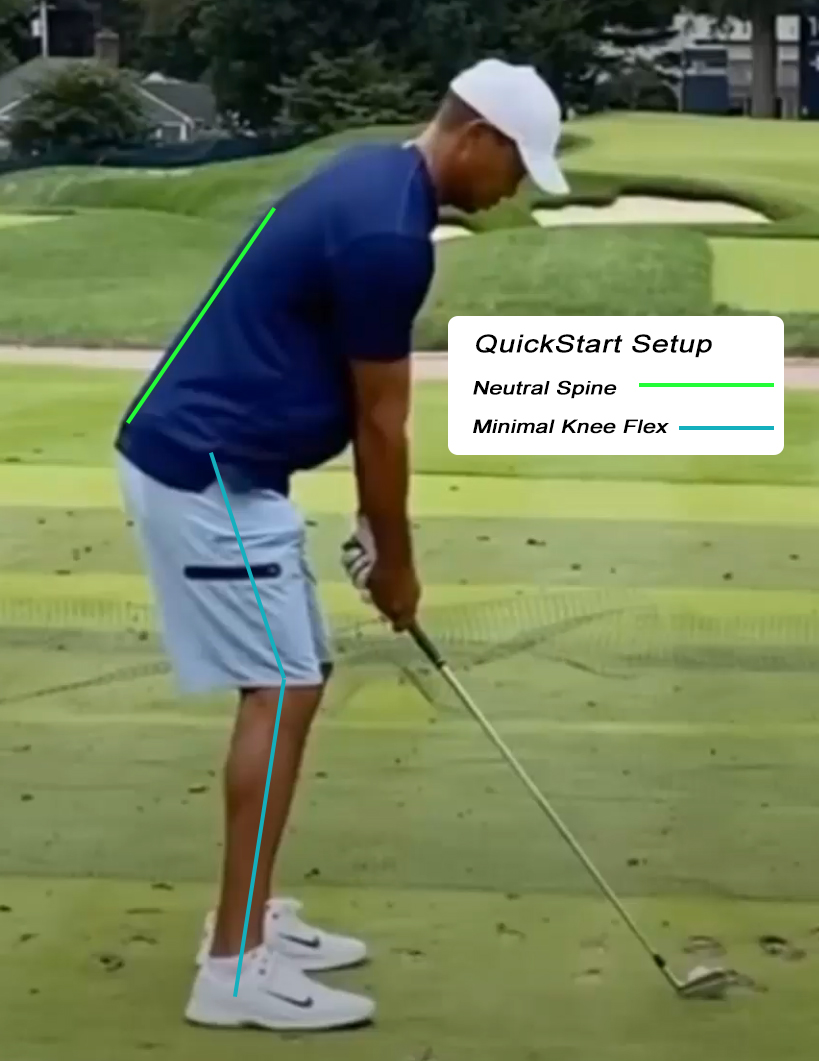
Now let's take a look at the down the line checkpoints.
From down the line, there's a couple major things that we're going to pay attention to.
One, and the biggest one, is making sure that your spine is nice and neutral.
We see a lot of golfers who get really rounded shoulders, and this creates all sorts of problems in the swing.
So just make sure that your spine stays nice and neutral.
A simple check for that is hold a club back here on the base of your spine, your head, and it'll touch the middle of your back.
And as you hinge forward, just keep your spine nice and neutral and your shoulders staying back.
Don't keep them rich back and tight.
Nice and relaxed, but don't let your shoulders round forwards or reach for the ball.
Keep your shoulders nice and neutral.
You'll have a nice neutral back.
The second thing we see really common is being too squatty through the legs.
You need to stand tall through the legs.
Don't get a ton of knee flex in here.
And of course, you don't want your legs locked out.
That's not athletic either, but you're going to have minimal knee flex, just enough to kind of relax the knees and get your pressure toward the middle of your foot, toward the ankles.
We kind of use 50-50.
If you're somewhere in the middle of your foot, you don't want to be way out on the toes and the balls of your feet.
That'll put you off balance.
And you don't want to be way back on your heels.
But somewhere between your ankle and the middle of your foot is a great point to start.
So if you're set up with a nice neutral spine, your shoulders are back.
Keep your chin back.
Don't tuck your head forward like this.
Keep your chin back.
Hinge forward.
And if you're keeping your chin and your spine in neutral, You'll have to hinge forward, perhaps more than you're used to.
If you're the type of golfer who's used to having a lot of bend in the legs and really rounded shoulders.
So as you keep nice neutral posture and your chin back, you may find that you hinge forward a little bit more.
And so you'll have to adjust where you feel your hips are in terms of depth behind your body to keep that weight distribution normal.
Because if you flex your knees a lot, technically I'm still totally balanced here.
My weight is right in the middle.
But obviously I'm going to have to make all kinds of compensations to swing the club like this.
So as you're keeping your spine neutral, hinging forward, these are going to be the primary checkpoints we're looking for when you do your checkout with your setup.
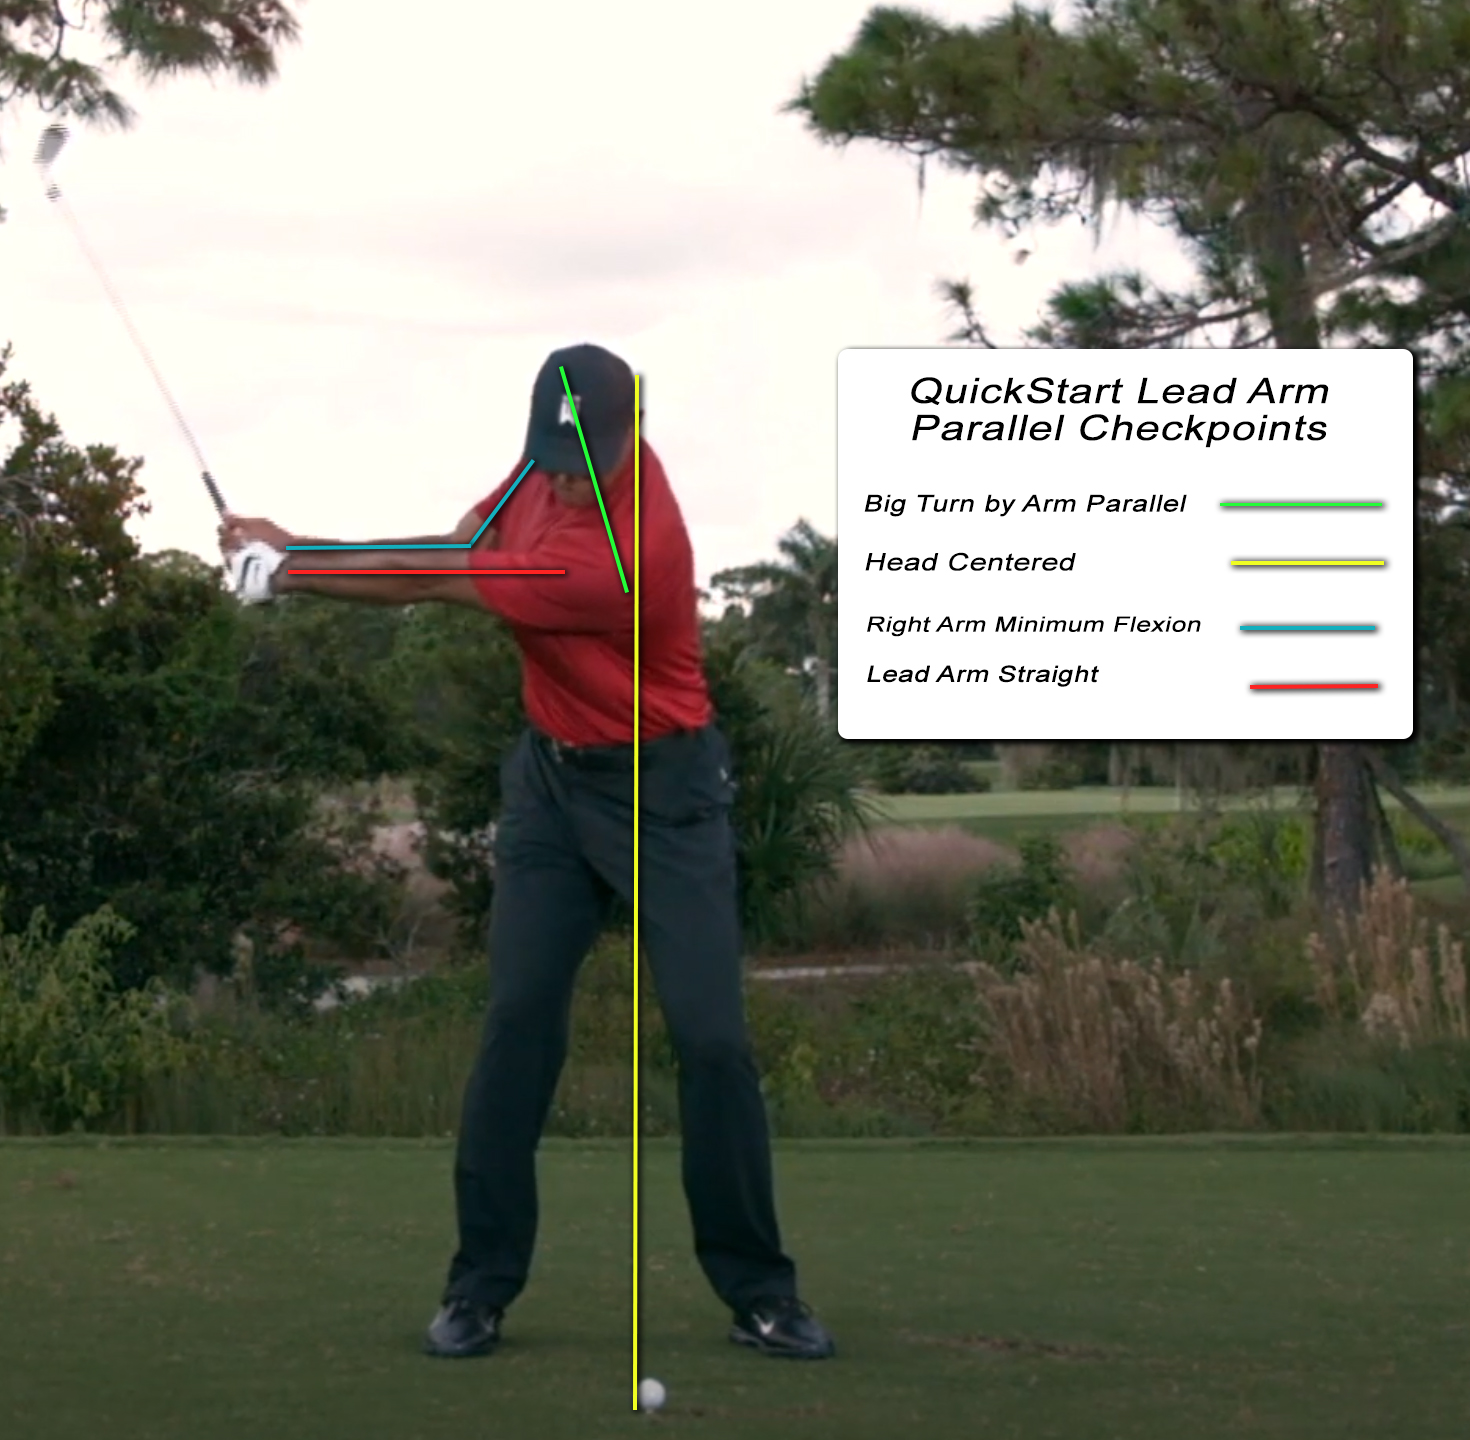
Once we start our actual swing, there's only a few checkpoints we're going to look at from face on.
The first one, as you know, is our head has got to stay relatively centered.
A little tiny bit of movement off the ball is fine.
But we really want to try and feel that our head stays relatively quiet.
So when we're looking at it from halfway back.
Or if we get all the way to the top of the beginning of the compression drill, where our lead arm is parallel to the ground, we want to see that our head is barely moved and our trail hip line has appeared that it stayed exactly where it started at address.
If you do those two things, you will maintain the proper amount of axis tilt.
If you let your hip slide and your head move forward or your head stays centered and your hip slides away from the target, then you're going to lose your axis tilt.
So if you keep these two simple things, your head in place and your hip line in place, and you started out with enough axis tilt at address, you're going to be fine at the top of your swing.
So then the only thing you've got to watch is that your trail arm stays pretty straight during the takeaway.
Most golfers make a mistake of just doing this.
We want to start to feel turning.
And so that trail arm is going to stay nice and straight.
And that's going to make sure that we turn our body to bring that club back instead of just swing our arms.
Now let's look at down the line.
Once you initiate your swing with the axiom movement, you know that your pressure is going to move back toward the heel on the trail leg, which should move your trail hip a little bit deeper than where it started at address.
At address, it's not going to be very deep.
You're going to have your hips, if you dropped a club straight down from your hip, it's only going to be two or three inches outside your hip.
If you drop a club down and it's way back here, your pressure is way too far back and you're too squatty.
So your hips, because you're going to stand taller through the legs, you're going to have an ability to move into a deeper position to really get loaded up in the backswing.
And that's one of the things we're going to check is that hip should stay.
It should appear at least where it started at address.
It should never move away from the line where it started at address.
It should always stay or move slightly deeper.
Once you do that, it makes it much easier to take a steeper shoulder plane than what most golfers typically do.
Most amateur golfers tend to turn their shoulders really flat.
And so you know that you need to turn your shoulders roughly 90 degrees to the spine angle you established at address.
So in order to do that, it's much easier as your hip goes deeper.
It will actually increase your spine angle slightly, which will also cause your head to drop slightly.
You never want to see your hip moving up or into the ball during the backswing and your head moving up.
That's a death move and it's going to lead to flat shoulders as well.
So as you're doing this, trail hip gets deeper, pressure goes to heel, shoulders go on plane, which will be 90 degrees to your spine angle or even slightly steeper.
If we got those things, we're golden.
It's from down the line, when you look at the club, during this initial phase, especially when you're doing your little compression drill shots and you're just going to the takeaway position.
So let's say you're just going to hit a little shot to here or swing back to here and then come through.
It's okay if the club goes a little bit inside.
We're going to refine that as we get into the fundamental stage.
But if the club goes a little bit inside, because this gives you a little bit of feel in your wrist and gives you something to hit with when you're making these little tiny shots, that's okay.
The momentum of the club is going to want it to go back in there.
As we get into the fundamental section, that's when we're going to start making sure that the club is staying, you know, in line or outside of your hands as you go back.
But the one thing you're really going to want to make sure when you're doing this is you don't have a lot of wrist hinge.
And the club is going away inside and your trail elbow is folding.
You don't want that.
That's a death move.
So as we go back, you'll see my trail arm is going to stay straight.
The club head might go a tiny bit inside.
Use a little box range here.
As long as it's not way back behind you at this stage in the swing, you can still put the club back on the ball just fine.
So if we put these things together and we now go to the end of the beginning of the compression drill where we're going lead arm parallel, this club shaft should swing up on plane.
So you can see my shoulder, my hips have gone deeper, my pressure's on my heel, my shoulder's a little steeper, my lead arm is parallel to the ground.
The club is pretty much on plane here.
If we've got these things going, all systems are go and you're going to pass your check out just fine with flying colors.
And you should be able to hit the ball very squarely, very consistently, and get the ball to start and stay on your starting line.
Now let's take a look at the downswing checkpoints.
The downswing checkpoints are going to be very, Very easy when you use the axiom movement.
Because it's going to make all of these things that you need to do in the swing, and the best players do in their swings happen automatically.
So let's take a look at what that's going to look like.
So I know I'm lead arm parallel on the compression drill, and now I'm using my trail foot, that clockwise pressure shift to move everything back to the lead foot as I get off the merry-go-round.
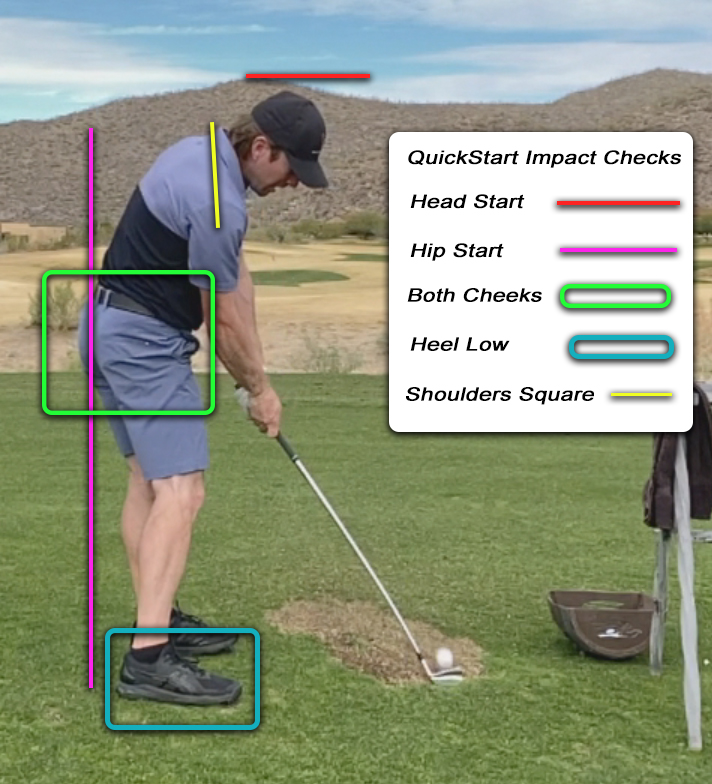
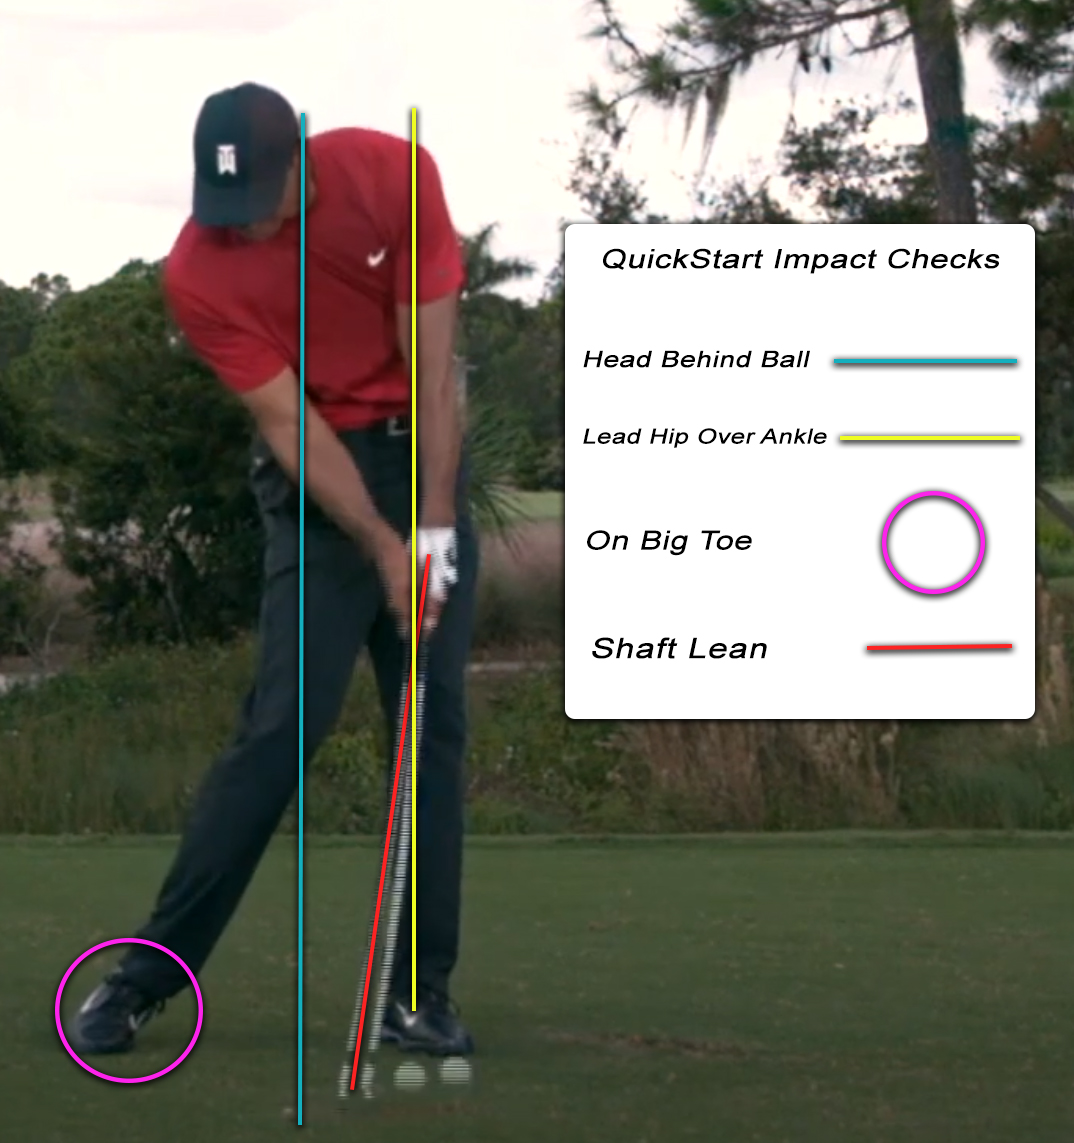
And that's when we start looking at our checkpoints at impact in that my lead hip is going to be in neutral.
90% of my pressure's on my lead foot.
I'm up onto the toe of my trail foot, but my heel is low to the ground.
My trail knee is pointing at 10 or 11 o 'clock.
My head is behind the ball, and I have a little bit of shaft lean, and I'm in perfect balance.
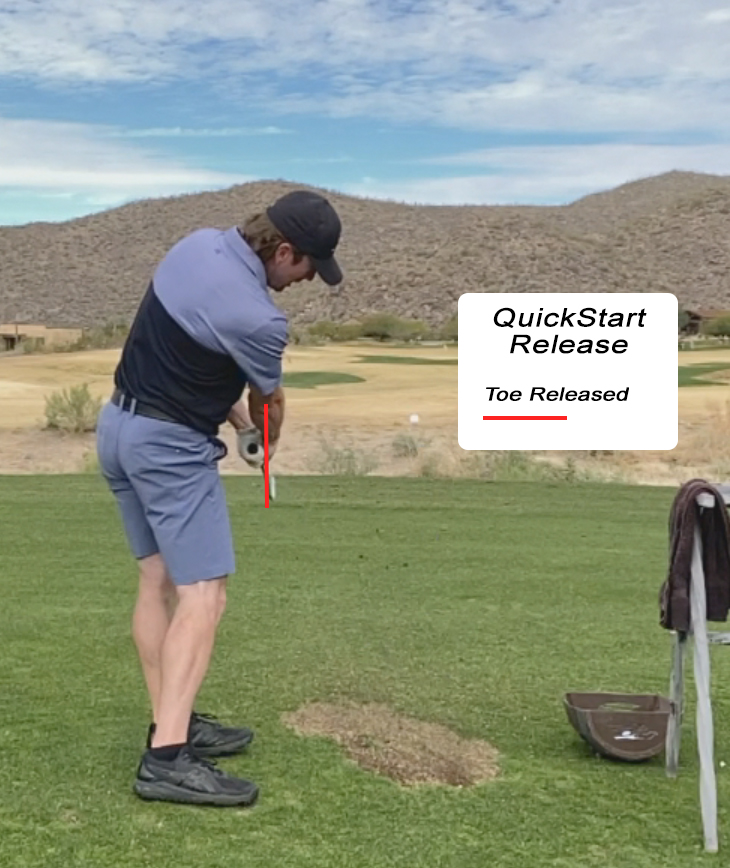
The only thing from here that I'm going to check is that as I come into the release, no chicken winging.
If I just let the club release and rotate over, as we'll talk about on down the line, we'll look at the club face angle in a moment, both of my arms should be straight at the time the club is parallel to the ground, and it'll start to fold slightly thereafter.
Now let's take a look at the down the line checkpoints.
From down the line at impact, I want to make sure the first thing is I can see both butt cheeks by the time that club strikes the ball, which should be in the center of the face with the club approaching the ball from a shallow angle of attack.
We're not digging squirrel graves here.
I should be coming in very shallow to the ball with the club striking the ball from the inside with a square face, which should lead the ball to start out on my line and fly pretty straight.
So from there, as we walk it back a little bit, the one thing we're going to be looking for is that the club is shallowing out, that you're using that clockwise movement of the hand movement in order to get that club to approach the ball from the inside.
If you're going this way, that's not going to work.
So we need you to feel that little clockwise pressure shift because you can see how that brings the club straight down to the inside.
It makes everything happen automatically.
So now my hips are open.
I can see both butt cheeks.
The club is shallowed out.
My shoulders are square.
Hips are open.
My knees pointing at, you know, 10 or 11 o 'clock.
And as I get into the release, I want to make sure that that club is towed up at parallel to the ground or slightly towed in.
If you hit those checkpoints, you're going to be hitting great golf shots.
Quickstart Fundamentals
Notes: FO refers to Face On view, DTL refers to Down the Line view. Clockwise references are for righties, reverse to counter clockwise if you play left handed.
Setup
- Proper axis tilt 2-8* FO
- Lead ear on back of ball (1 ball width either direction OK) FO
- Tall through the legs - not too squatty, hips 2-3” behind heels DTL
- Weight 50/50ish left to right and front to back
- Proper stance width FO
- Spine neutral DTL
- Shoulders back but relaxed (no reaching for the ball) DTL
Backswing (to lead arm parallel)
- Head staying centered FO
- Head staying level or lowering slightly DTL
- Trail hip line maintained FO
- Trail leg not fully straightened (minimal loss of knee flex) DTL
- Trail hip deeper than setup DTL
- Trail arm and wrist not folding too soon nor too much (maintain width) FO/DTL
- Club not too far inside or outside during takeaway - box range DTL
- Club close to on plane at lead arm parallel DTL
- Pressure moves back to trail heel at top of swing DTL
- Axis tilt from setup maintained at the top - no reverse pivot FO
- Hips not over rotated FO/DTL
- Lower body not over active FO/DTL
- Shoulder turn on plane (roughly 90* from setup) DTL

Downswing
- Pressure shifts back to lead ankle using AXIOM FO
- Pressure moves up onto big toe/ball of trail foot but heel low FO/DTL
- Club shallows and hands move clockwise for righties DTL
- Hips open (both butt cheeks visible) at impact/shoulders square DTL
- Strike off the center of the face DTL
- Head behind the ball at impact FO
- Slight shaft lean at impact FO
- Shallow AoA FO
- Lead hip in NJA FO
- Lead leg straight FO
- Club approaching from inside or square DTL
- Ball launching and flying fairly straight with little curvature DTL
- Pressure fully on lead foot at impact and in follow through FO
- Club released to toe up or slightly toe’d in position at shaft parallel DTL
- Balance maintained FO/DTL
- Trail knee pointing toward 10-11 o’clock FO/DTL
- No chicken wing - arms extended but relaxed FO