


RotaryConnect Lower Body Drill
Sorry, you need to be a member to access this video.
You Are Just Seconds Away - Become a member here!
Already a member? Log in now

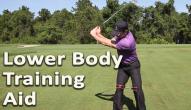
Build an incredibly powerful and stable base using the RotaryConnect.
- The upper body provides rotation in the swing, the lower body provides stability
- Faults like excessive hip slide & hip spin prevent the lower body from providing a stable platform
- Use the RotaryConnect above the knees to learn what correct form feels like
- Swing again without the device and try to reproduce that correct form on your own
In my introductory video on the Rotary Connect, talking about the backswing and the arms and the connections to the chest, I talked about how you use it with your upper body.
But the reality is, it serves two purposes.
And this is why a lot of people actually buy two of them to use at the same time.
You say, well I don't know if I want two, I can't have two on my arms at the same time.
You're right.
What you do with the second one is that you put it on your legs just above your knee.
So now, if I had two on, you see I have one with my arms.
I can focus on what my arms and upper body are doing during the backswing.
And then what the lower body stuff does is two things.
One, for those of you who tend to get, we see this quite a bit, Really overactive with your lower body doing this stuff, looking like you're skiing down a hill as you go back.
This is going to make your lower body very unstable.
It's going to cause your hips to over rotate.
It's going to cause them to tilt.
It's going to cause you to have to really spin your hips quickly coming down and keep you from building any torque between your upper and lower bodies.
So we want that left knee to basically stay about where it was at address.
Now it can come in and forward a little bit, but we see this all the time where people are really active with their lower body.
In the backswing, if you have the connect on above your knees, this is going to be really hard.
You're going to see, it's immediately going to push me out to the outside of my right foot and get me off balance and push against my knee.
It's going to feel really funky.
So as I go back, What this is going to do is help me learn the proper position of the left knee at the top of the backswing.
This is a critical thing in the swing.
So many people want to go too far forward.
They want to go too far this way.
They want to go too far down.
If you keep the connect on, it pretty much shows you exactly where it's supposed to be.
You don't have to think about it.
You don't think about, oh, should my knee go further down or should it go more in?
It won't let it move any more than it's supposed to.
So it's a great, simple fix.
But this isn't the real beauty of it.
The beauty of it comes in the downswing.
As I start down, the most common mistake we see people is pushing off this right foot, the right heel coming up in the air.
This is the dreaded lose your posture, the puppy dog humping the fire hydrant, you hear me call it all the time.
So as we do this and push off the right leg with that right foot and right hip, all of a sudden, everything in our swing changes.
We lose our spine angle, swing plane shifts to the right, et cetera.
So we don't want to do that.
So the great thing is the connect simply won't let you just like it won't let you push and slide going back with the left side.
When you push really hard with the right side, look how it forces my knee to be in this really awkward, weak position.
You know that you want your left knee to be right over your left ankle as you come into impact for a stable, powerful position.
So when you push really hard with your right leg, you're going to immediately know that this is no bueno.
Of course, if you're looking at your swing on camera or in front of a mirror, it's going to make this way quicker, which I obviously recommend.
But as you're coming down now, you can start to focus on moving from the left side.
And it's almost a feeling that you're trying to create more space with the left side during the downswing.
What do I mean by that?
Imagine that this could move, and you're wanting your left knee to get further away from your right than where it is at the top of the backswing.
Most people do the opposite.
They take their right knee, take this off for a second, and close down this space.
So now you can see, I've lost a lot of space because they just moved from the right side and the left side isn't trained correctly.
What you'll see any good ball striker do, any powerful ball striker, their left knee is going to move first and the right knee is going to stay quiet.
And they're almost going to increase the space between their knees.
And that's going to allow them to get into this position, which is much more stable than this position, of course.
But also it's allowing us to load up on the left side and post up, which you've seen in the you hit the ball with your legs video.
So this device makes it basically impossible to do it wrong.
Or if you do it wrong, it gives you instant feedback, which is what the real beauty of everything we do with rotary spin.
We need to see right away when we make a mistake.
That's why the mirror is so important so that we can start training our body to do it correctly.
So if I do it wrong, immediately my knee gets bashed out of position here.
I feel really wonky.
But if I stay good, coming down, I let my left knee move first, get into this nice stable position, you'll see that I still have the same spacing, my knees over my foot.
And as I get into impact, I stay in this nice, powerful position.
So you don't have to buy two, but if you want to work on two things at once, It helps so that you use one on your lower body when you're working on your lower body movements.
And use one on your upper body when you're working on the upper body movements.


Kevin
Craig (Certified RST Instructor)
Marc
Jackie (Certified RST Instructor)
Marc
Jackie (Certified RST Instructor)
Jeffrey M
Craig (Certified RST Instructor)
Stephen
Craig (Certified RST Instructor)
Mike
Craig (Certified RST Instructor)
Benjamin
Chris (Certified RST Instructor)
Ed
Remington
Craig (Certified RST Instructor)
Peter
Byron
Craig (Certified RST Instructor)
Peter
Craig (Certified RST Instructor)
Peter
Richard
Richard
Craig (Certified RST Instructor)
Alan
Craig (Certified RST Instructor)
Robert
Craig (Certified RST Instructor)
Hector
Craig (Certified RST Instructor)
Hector
Craig (Certified RST Instructor)
T David
Craig (Certified RST Instructor)
Jim
Craig (Certified RST Instructor)
Joe
Craig (Certified RST Instructor)
Joe
Craig (Certified RST Instructor)
Joe
Craig (Certified RST Instructor)
Chad
Craig (Certified RST Instructor)
matt
Craig (Certified RST Instructor)
matt
Craig (Certified RST Instructor)
Anthony
Craig (Certified RST Instructor)
Christian
Craig (Certified RST Instructor)
edward
Craig (Certified RST Instructor)
edward
Craig (Certified RST Instructor)
Larry
R.J. (Certified RST Instructor)
Perry
Craig (Certified RST Instructor)
Anthony
Craig (Certified RST Instructor)
Anthony
Anthony
Craig (Certified RST Instructor)
Anthony
rod
Craig (Certified RST Instructor)
anthony
Craig (Certified RST Instructor)
Mark
Craig (Certified RST Instructor)
Hugh
Craig (Certified RST Instructor)
Paul
Craig (Certified RST Instructor)
Ste
Craig (Certified RST Instructor)
ivan
Craig (Certified RST Instructor)
David
Craig (Certified RST Instructor)
Steve
Craig (Certified RST Instructor)
gordon
Craig (Certified RST Instructor)
Steve
Craig (Certified RST Instructor)
David
Craig (Certified RST Instructor)
Juan Eduardo
Craig (Certified RST Instructor)
nigel
Chris (Certified RST Instructor)
gary
Chris (Certified RST Instructor)
Ryan
Chris (Certified RST Instructor)
ivan
Chris (Certified RST Instructor)