


AXIOM BootCamp 4, Chris Tyler, Jan 2022, Session 3
Sorry, you need to be a RotarySwing Academy member to access this video.

Session 3 of 4
You are absolutely damn skippy, Craig Morrow.
We are going to be swinging for the fences tonight.
Welcome back, everybody.
Happy Tuesday.
Good evening.
Good morning to some of you.
Hopefully you guys are having a great start to your week so far.
I have a lot to do tonight.
We got a lot to cover.
And tonight's going to be kind of a fun night because Gregory and I were doing a little discussing tonight before.
We are kicking off tonight's presentation and we made an executive decision together that we are going to change the format just a fraction.
And we're going to actually start out with release drills and we're going to reverse engineer that into a full compression, full nine to three drill, which rather than going back through the lower body movement at first, going back through all of the three positions, we're going to think based off of what we've seen this week, because we've seen some really good stuff.
In fact, I will say this right now.
This is the best boot camp I've seen with people sending in reviews as far as movements are concerned, which gives me sort of the impression that you guys are more of the veteran crew.
We might have some people that are new, but for the most part, even with the newcomers and the reviews that we've seen at this point, we've seen some very awesome stuff.
So welcome back, June.
Welcome back, Michael.
Hopefully everybody's having an awesome week so far.
Hopefully everybody can hear me all right.
How's the audio tonight?
Everybody hear me just fine?
So, I love that.
Thank you, Michael.
Welcome, Alan.
Welcome, welcome.
So, first order of business tonight.
For those of you that have attended any of our mini RSA webinars, if you guys have any specific topics that you would like myself, Craig, or Chuck to talk about over the next few months, go ahead and post those up in the comments now so that we can go back and look through those and get some ideas from you guys.
We have compiled a pretty long list ourselves, but we want to hear it from the members and see what you guys want us to talk about.
If you don't have any good ideas, then you don't have to type anything out.
oh, Alan.
So I will make sure on Saturday that I type it in the chat before we get started.
I will copy and paste it into the chat.
So you have a farewell gift from me.
Unless you want to make it between now and then.
Then you can hang around afterwards, and then I will give it to you.
Welcome, Theodore.
Welcome, Ted.
Welcome, Alan.
Todd K.
checking in.
Saturday is good.
Thank you for your patience.
So we have a jam-packed night tonight, and I do want to start off by saying I made a big, big boo-boo in last session.
I made a big mistake, and I talked to this individual.
after the session.
And I want to go ahead and acknowledge the fact that I was kind of a jerk to Paul O because Paul was being like a pump up man in the chat.
And he said, let's go.
And when I saw that out of the corner of my eye, I thought it was telling me to hurry up and get to the point.
And so we've actually had somebody do that in previous boot camps.
I think it was when Craig and I were doing the dead drill stuff.
And so when I saw that, I was like, I know I can get long-winded at times, and I know I can talk about some things that might not feel like we're on that specific topic.
And so, Paul, my sincerest apologies, all right?
Thank you very much for your enthusiasm.
Thank you very much for pumping up the crowd.
We love that stuff.
So please don't shy away from that stuff.
I know that this stuff can be exciting for a lot of you at home.
So, Paul, I owe you a full swing review at the end of this camp.
I appreciate your.
patience with me in this process.
Sometimes this can be a little bit nerve wracking.
You guys get it?
Like we're standing up here in front of a camera talking to a bunch of people.
Thanks, Paul.
Appreciate it.
Also, we had another superstar this week.
I'm going to do my best to remember the name.
Last name was started with a W.
It was a woman.
Helen.
Helen W.
Absolutely.
freaking rockstar movements.
Now I did hear from Craig before the start of the session tonight that you might've had some issues uploading your videos in the past.
So we apologize for that.
Obviously that is something that we don't take very lightly.
We like to make that process as seamless as possible.
But the videos that I got to look at today were absolutely awesome.
I couldn't make any bad comments about them.
So congratulations to you on your game ball.
You get a game ball and a MVP award.
And so I see you guys are all making jokes in there.
So if you guys have any suggestions on anything that you want us to talk about in the mini webinars, please post those up tonight before we get into tonight's coverage.
And tonight, what we're going to be doing is this is where the fun starts to happen, right?
So I like teaching the release on Saturday.
I like giving you guys some freedom.
I like giving you guys the club back in your hands.
And I certainly like you guys trying to introduce the golf ball back to the mix.
And I like being able to kind of go into this part tonight where we start giving you some movement to help speed that stuff up.
Because this is really what your golf swing is going to be like with a little bit more width and rotation, which we will be adding in on Saturday night.
Now, some of you, when we get to Saturday, are not going to be able to get to full swing.
That's totally fine.
I want you to remember that this is all about how you practice.
So tonight is not new information.
It's just walking you through step-by -step on the stuff that we've covered so far.
And how to blend these two together and turn them into the compression drills.
And the compression drills, you can also consider them kind of like the nine to three drill.
The nine to three drill is one of my favorite drills on the website.
Why?
Well, because what it does is it helps cover so many areas of the golf swing that are super important.
It helps cover sequence.
It helps cover impact positions.
It helps cover hand and arm path.
It helps cover the release.
It helps cover post up.
It helps cover the real big nuts and bolts of how you hit the golf ball.
Yes, it's a little bit longer version of what we talked about with the hitting area stuff.
But when you get to a really proficient nine to three swing, what it's going to feel like is for those of you that are lead side dominant releasers, it's going to feel about you're swinging about 50 to 60% of your normal speed.
but the golf ball is going right around 75 to 80% of your normal distance.
I think about that for a second.
We've had this quite a bit.
We've had people say to us, well, Chris, Craig, Chuck, why don't I just go out there and play golf with a nine to three format?
You can, you can certainly play golf in a nine to three format.
Think about nine to three as being when your arms are parallel to the ground or a chest height.
This is what you're going to be working up towards.
Now, when we introduce.
the two blending of these movements together, where I start blending in the release and I start blending in the axiom movement, you're going to actually start out by getting yourself into nine to three just to kind of wake up and feel the synchronization of these movements.
But when we start adding the club and the ball to the mix, we're going to be very disciplined and teach you how to practice this stuff in a much more condensed environment.
Now, one of the things that's really hard for you guys to do at home is because the swing is going to be shorter.
is for you to commit to where your force of movement comes from.
But I promise you, if you use that sort of aggressive feel that you created from your legs and your hips that we've been looking at this week and last week, we've seen a lot of good stuff, and you focus on where you're trying to get to, and you just keep your tension levels as reduced as much as possible through the hitting area from your lead arm, then you're gonna have some great results.
Now, I'm gonna go ahead and ask a question.
This is a bold question, and Craig is probably gonna punch me for this one, but so be Do we have anybody in the chat tonight?
And it's okay.
I'm not going to single you out.
Do we have anybody in the chat tonight that is embarking on the trail side dominant release that's going to be going down, releasing the club from their trail hand?
If you do, please post up and let me know.
If not, no big deal.
So I see we got a bunch of crickets.
Okay, Kenneth, so we got one.
Can you put a bright sticky dot on the body part you're highlighting?
That could get pretty dangerous, but sure.
So Mike says, I feel like I do, but I don't want to.
It probably is hurting me.
I have a way too dominant right hand trail head release.
Okay, possibly.
So it looks like we have a little bit of interest.
So the reason why I asked you guys that tonight is because it's going to really kind of help me structure how I'm going to walk you through this practice program.
And I'm probably not going to change much because when you look at the nine o'clock position, both in a trail side dominant release versus a lead side dominant release, it's going to be the same exact position.
So when you're looking at it from a down the line perspective, you're going to see that the lead arm is still going to be parallel to the ground.
You're going to see that the club shaft is still sitting underneath the right shoulder.
And you're also going to see the exact same delivery points.
So we talked about your delivery position the other night.
Um, where?
Hopefully you guys got a pretty good understanding as to how important this position really is.
You get into a good delivery point where your hands are in the middle of your trail thigh.
You look at it from a down the line perspective, and the club is in line with your hands here.
Then it doesn't really matter how you move the club from one side of the body to the other.
Really, per se, as long as you create stability in the club face, and as long as you create shaft lean, I will say that.
The big benefit to the lead side dominant release, which you've heard me talk about for two sessions now, is that it's a lot more free-flowing.
It's a lot less effort.
And there's less room for error, really, because your lead hand is always in front of the golf club if you're doing it properly, where your trail hand sits behind the golf club.
And like we said before, this is your crackhead brother.
And I know that's really bad terminology.
I'll come up with something different.
Just bear with me.
But this guy's sitting behind the club, and he's ready to manipulate the face angle very quickly.
Face angle, this thing right here.
is 80% of your shot shape.
So if you have something that creates a lot of instability in it, fine.
So I think what I'm probably going to do tonight based off of the approach that we're going to take tonight, we're going to go down that reverse engineered pathway, is I'm still going to talk mostly from a lead side dominant perspective.
I will show some examples again, with both hands on the golf club from a trail side dominant.
Where I have you literally turning your shoulders and extending your hands and arms down the target line.
So you will see that example because If you want to continue to play around with it between now and Saturday, that's totally fine.
I'm not going to shy you away from it because we understand, right?
People have played golf for an extended period of time.
People just don't have any coordination in their lead hand.
People don't want to take the time to train that lead hand.
It doesn't mean that you're inept or you're incapable of doing this stuff.
It's just that's your decision.
I also understand because I don't live under a rock, okay, that most of you guys are going to be playing and practicing through changes.
And not one of you, and I mean one of you at home, can tell me that you want to go through the struggle period.
So if you feel like this is going to help you stay away from that struggle period, totally fine.
So here's our agenda tonight.
Our agenda is to talk about the nuts and bolts of the release.
Without the golf club, we're not going to go into all the details that we did on Saturday.
Then we are going to get the lower body movement synced up with the lead arm.
Then we are going to.
add the golf club back to the mix.
We're going to get both hands and arms on the club.
I'll show you the differences in the two release.
I'm going to give you a couple of little small checkpoints.
And then what I'm going to do is I'm going to handle the most boring topic in the world.
But some of you guys found this pretty interesting the other day is I'm just going to teach you guys how to practice this, right?
If you learn how to practice this and you stay disciplined in this process, you see this red lettering here on your slides.
If you stay disciplined, then you will see results.
If you understand that when you don't see good results and you are actually tracking your ball flight and your strike itself, then there's probably a chance that you need to start trying to backtrack a little bit.
It's okay to come back a little bit.
I personally, I do it all the time.
If I haven't played golf at all or I haven't practiced at all, I have no problem sitting out there doing little small shots.
I have no problem doing that because again, When you think about golf, it's very precise.
If you go out there and you start making little subtle adjustments to what you're doing with your hands and your arms down through the hitting area, then golf is just an explosive world that you don't want to be in.
Okay, so our agenda after we get these things blended together, we get the club back in your hands, is I'm going to open up for Q&A.
Tonight is probably the biggest night for Q&A because I want everything answered in your brain about what it is you're doing, why you're doing it, and how you're going to get it done.
If you can get these two pieces melded together, whether you're hitting balls or not, then Saturday, you're going to leave here with a very clear understanding on how you are doing things moving forward, okay?
So tonight, I want all of the questions that you have in your brain that you don't have answered.
And you don't think that you can go without having these things answered and get these things 100% accurate, okay?
Super, super important.
So now, what we're going to do.
Is I'm going to ask that?
The chat remains quiet from here to the end of the session.
Okay, because we got some work to do.
For those of you that want to practice along with me, that's a great idea.
Okay, I want you to get up out of your chairs and I want you to follow along with the movements with me.
Tonight, I'm going to be demonstrating things from three different angles.
I'm going to demonstrate from face on, I'm going to demonstrate from down the line, and I'm going to demonstrate from up the line.
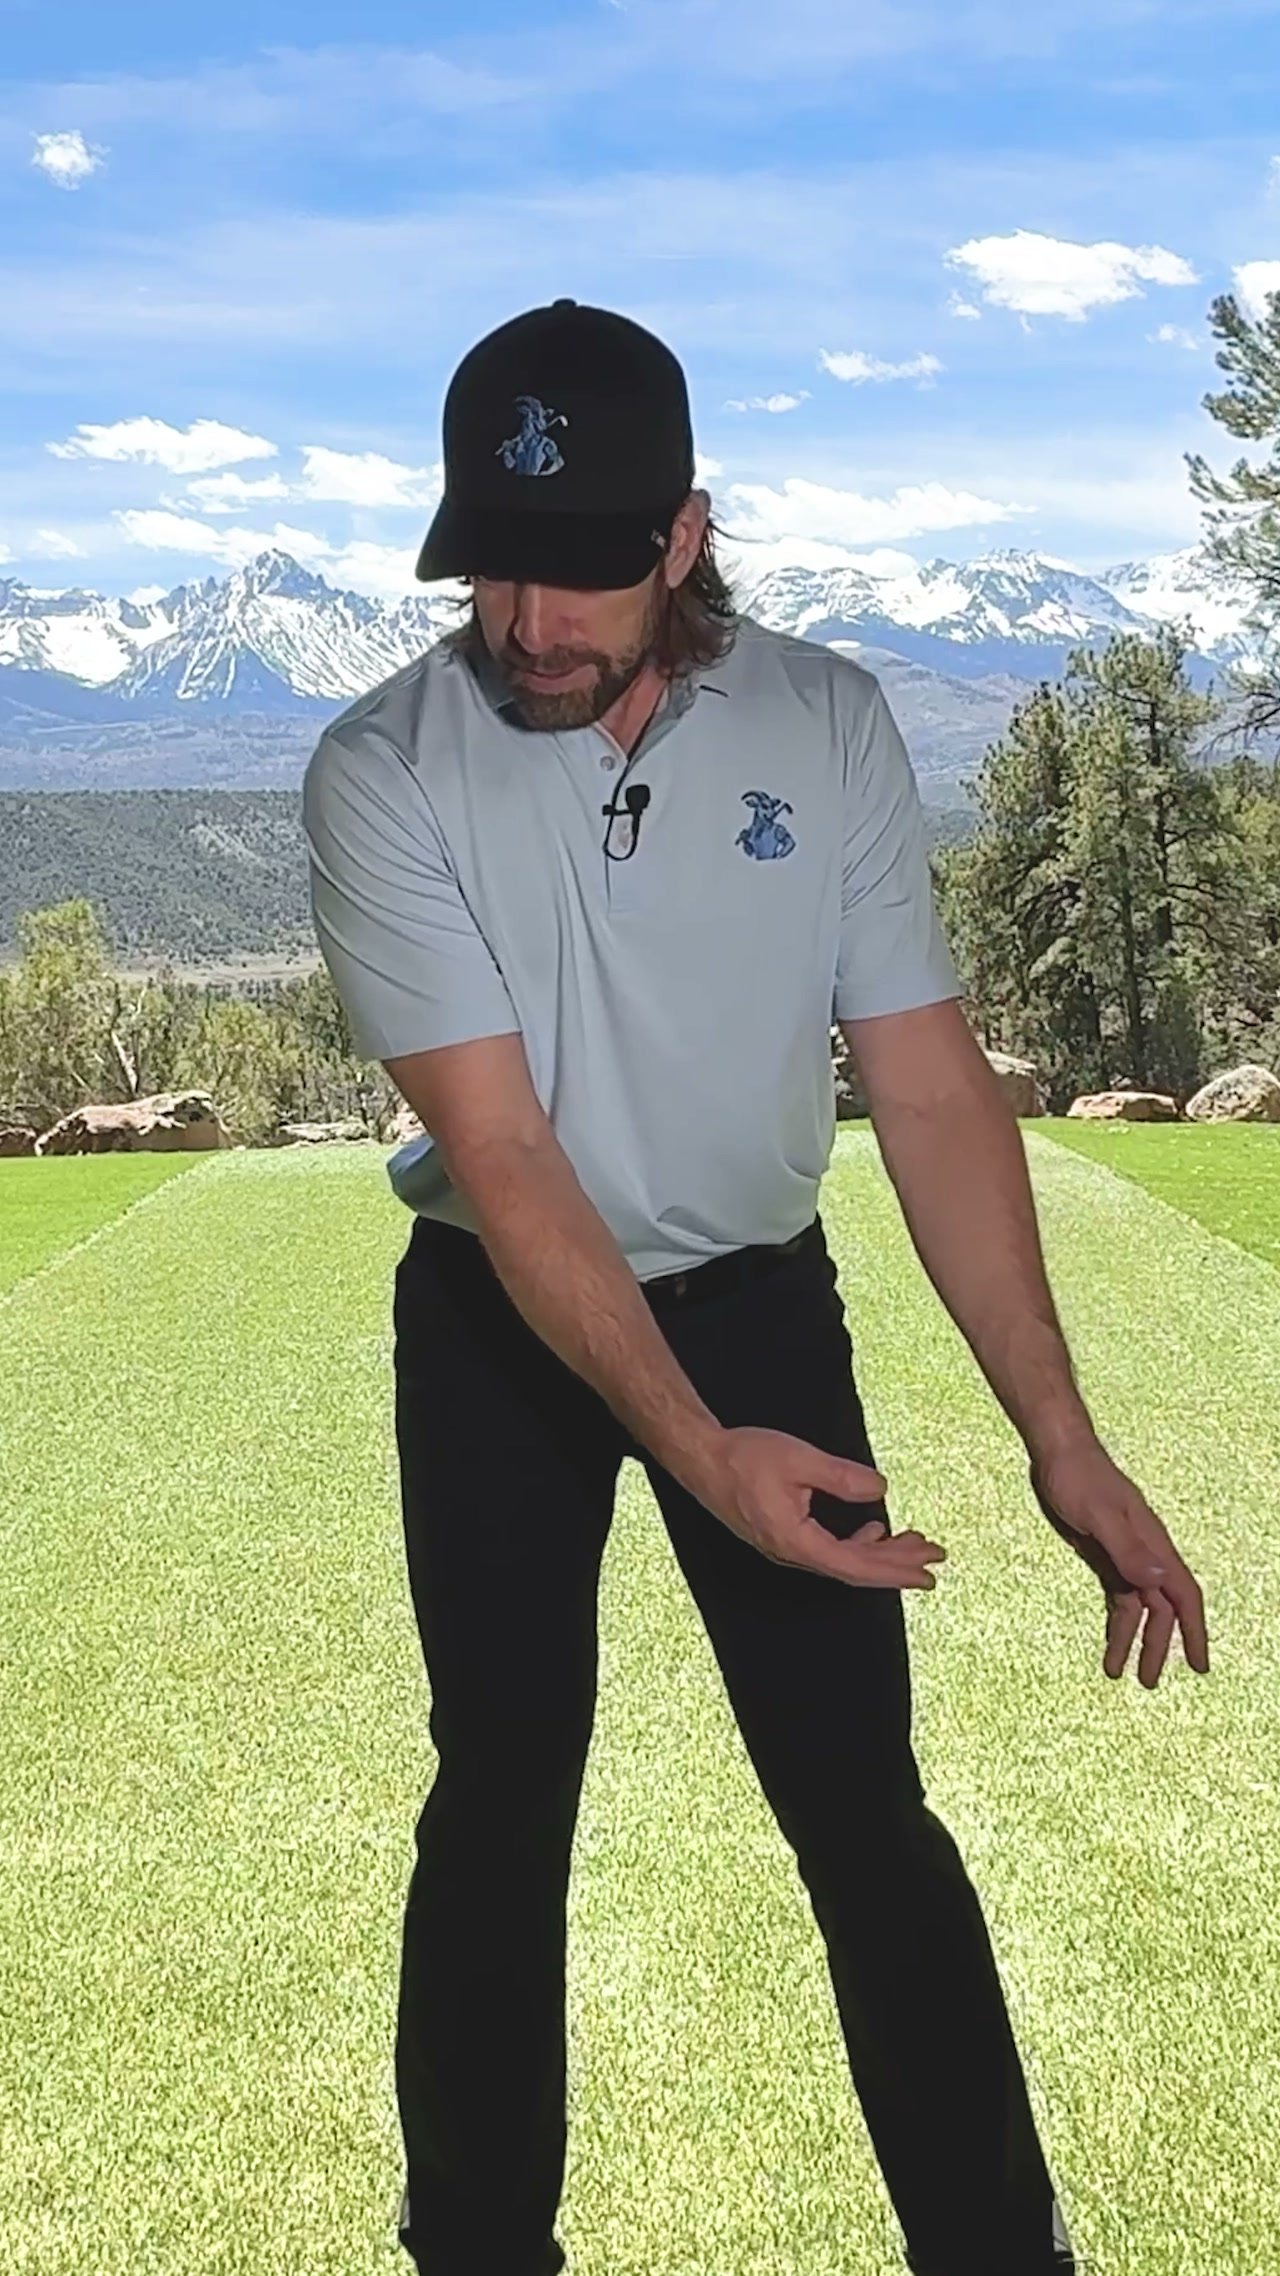
Okay, and we are going to start out with just our lead arm and we're going to put ourselves into an impact position.
How do I want you to get into impact position?
Well, I want you to go ahead and get into your setup.
So you guys should all be pretty proficient with setup at this point.
Two inches outside of neutral.
You're going to hinge to get yourself over the golf ball.
Soften your knees.
Let your arms hang freely.
Little, teeny, tiny, baby bump of the hip towards the target.
You hear little, teeny bump.
Got it?
Not this, okay?
Please don't do that.
I saw two of you do this.
And yes, you got the wrath, but I was nice about it.
You know who you are, okay?
So you're going to get yourself over the golf ball, soften your knees, arms hang freely, little nudge.
That's it.
Cross your arms over your shoulders, okay?
Move your hip left, open them up, and keep your head and chest back behind the golf ball.
Now, this position, if you stay here for long, is going to start becoming uncomfortable.
It will.
Why?
Well, because you got a little bit of side bend, you got your hips opened up.
Okay, this is a position that we don't hit in the golf swing, we move through it.
So I'm not going to have you do an extended period of reps.
We're just going to start doing what?
Well, we're going to start letting our left arm swing back and forth like a pendulum, just outside my trail thigh, just outside my lead thigh.
Now, On these first five or six reps, all we're trying to do is we're just trying to release tension.
You guys are probably thinking at home, well, Chris, last time you told us to stop at impact.
Watch, we're gonna be doing things a little bit different tonight.
We're gonna teach you guys how to practice this the proper way.
So we're just getting tension out of here first.
Now, after we get our tension out of there and our arm is swinging freely, we're gonna stop at impact and we're gonna check to make sure our left wrist or our lead wrist at home for you left -handed players, is going to be flat and pointed down the target line.
Now, I wore a big face watch tonight, so you could see where my wrist was pointing.
I think that's a little bit easier for you guys to follow at home rather than my glove.
So when you look at my watch, it's going to be pointed directly out in front of me, and it's going to be pointed directly down the target line.
Flat or slightly bowed, okay?
For those of you that have been flippers or scoopers, habitual flippers or scoopers, go to a bowed position.
Make it look like if you had a hole in your palm without moving your head all over the place that you could see down through your palm to the floor.
That's So now you're going to go back and forth for another few reps.
Look how small my reps are.
Teeny tiny.
I'm not up here going like, okay, just little small reps.
Okay, everything that we're doing with our body in the swing is helping move our hand and arm faster.
This is a very relaxed movement.
It's just chilled out.
So every once in a while, I just want you to stop at impact.
Check it.
Make sure it's right.
I don't want it facing back at home.
I don't want it like this where it's cupped, okay?
Let it swing back and forth.
You're just going to warm up like this.
Now, I can tell you I probably just did that for about two minutes, and I can already feel some discomfort in my lower left back, a little bit on the outside part of my hip as well.
So it's important that you don't do extended periods of reps.
Because I don't want your body to fatigue.
I don't want you to hurt yourself.
And I don't want you to be able to practice this stuff.
So give yourself a little break.
So I'm going to do the responsible thing.
I'm going to go over here and get a little water.
All right.
And I'm going to come back in.
Okay.
Now, what I want to do is I want to start going back through the lower body movements and how I'm going to start working this stuff.
But I'm going to do it without my left arm present.
So I'm going to take my setup and we're actually going to do.
the hybrid movement without a whole lot of body turn.
We're just going to kind of focus on what our hips are doing first.
Okay.
I want you to get your legs and your hips warmed up so that you can feel that pressure shift into the trail ankle right towards six o'clock.
And we're also going to work on moving from six through seven, eight, nine.
And we're going to move into that same post-up position that you were just holding static.
But before we do that, we're going to get into a good setup.
Okay.
Arms hanging freely.
Bumped it.
Nudge.
Little baby hip, that's it, small one.
Cross your arms back over your shoulders.
Now what we're going to do?
move our hip to the left over to neutral, open them up, hold it static.
Remember, it's always best to know where you're going before you try to get there right.
And that sounded like a bunch of wisdom.
Like I'm a grandfather sitting on the steps and we're eating where there's originals together, right?
So always best to know where you're going before we try to get there.
Okay.
Hold that static for a second.
Now reset yourself.
And what we're going to do is we're going to pressure shift to our right side.
I'm going to turn a little bit.
I'm not going to turn fully.
Why?
Because again, I'm not trying to get my upper body to be a focus point.
I'm just trying to feel a little bit of pressure into my right ankle.
You'll see, we'll start filling this all in just a minute.
Now, remember the key movements here are getting from six o'clock all the way to the interior part of your trail foot.
Okay.
Through seven, eight, nine.
So you can kind of see I'm really trying to put a lot of pressure there and that's going to be a very aggressive movement.
So six, seven, eight, nine is going to be when you start pushing to get your hips moving laterally, right?
Your whole body moving laterally.
You can kind of see how my head and my chest are moving along with my hips.
It's okay for your head to move.
Don't panic.
Okay.
So I'm starting to feel that six o 'clock.
Okay.
Seven, eight, nine.
I'm not really thinking about the secret sauce movement.
I'm just trying to feel that freedom, okay?
So the goal there is to feel the pressure to the right ankle, to feel your body move back into position, and to feel your hips moving laterally.
Now, now that you've got that feel, what are we gonna do?
Well, we're gonna put the little secret movement here with what we're doing with our left butt.
Remember, don't overthink this.
It's your left butt.
If I told you to take your left butt and move it down slightly and back slightly while you're pushing from that six o'clock up through that seven, eight, nine position, then your lead hip will move to the post-up position just by thinking about your lead butt.
Don't overthink it.
So now what we're going to do is cross our arms over our shoulders.
We're going to pressure shift, turn a little bit, six, seven, eight, nine, left butt goes down and back.
Okay.
You can see that I'm not moving.
Aggressively, I'm just moving smoothly.
Pressure shift Six, seven, eight, nine, down and back.
Pressure shift Turn six, seven, eight, nine, down and back.
Okay, I'm gonna turn down the line.
I'll go up the line here for you.
okay, so pressure shift right, six, seven, eight, nine.
Okay, now you want to make sure that you can go up onto that big toe if you want.
Okay, that will help make sure all the weights off of this side, Okay.
Make sure you pull that left button down and back, right?
You look and that transition, my left butt is moving down and it's moving back towards that golf bag back there.
Okay.
As my right side is helping me push, that left hip starts to move up and away at the same time.
I'm not thinking about that up and away movement, which as I said to you guys before, I think bootcamp number one, after we beta tested, I think those are the people that were most blown away.
So that tells me that either you guys have heard this before, or some of you have sat through the recent other sessions, or you guys are still processing it, whatever it is.
Hopefully you guys are getting to that position.
And in the reviews that I've seen, you guys have been doing this beautifully.
So remember, it's okay to push.
And I want you to think about your left butt moving down and back.
Okay.
Now let's look at it from up the line.
So I'm going to go ahead and take my setup.
I'm going to pressure shift right.
I'm going to turn a little bit.
Six o'clock.
I have a lot of pressure there.
I'm going to move seven, eight, nine down and back.
Okay.
Now, remember when you're moving down and back, a couple of things to think about.
Allow the head and the chest to move laterally back into position.
If it moves a little bit too far, you're totally fine.
We would rather have you error on getting a fraction further over than we would staying back.
Okay.
Hanging back on your, on your trail side, quite honestly, is one of the death moves in the swing.
Okay, so don't allow your upper body to hang back.
If you get out in front of it, it's easy for us to tone that back.
Okay, it really is.
So.
The purpose of that push movement is to get your hips moving, and you couple that with that down and back movement that gets you that post up.
So now, what have we done so far?
Well, we've isolated, we've gotten our left arm freed up, we've focused on getting to impact, and we've just warmed up our lower body.
Right, that's it Now, what we're going to do is we're not going to put emphasis on those three key positions that we talked about before.
We're going to put emphasis on a little bit of body turn, a little bit of pressure.
Because if you think about it, when I start at an address position here and I pressure shift and I turn my body, it doesn't take a lot of turn to get to nine o'clock here.
So we're going to add a little bit of turn in there and we're going to try to get to nine o'clock.
Now, here's the big thing to remember.
If you go to the nine o'clock position and you try to hold your arm in this position, you can do this at home, okay?
So my arm is here.
It's relaxed.
It's passively straight.
It's not ramrod straight.
I'm not sweating holding it here.
I want you to watch.
As soon as I move from six o'clock through seven, eight, and nine, and I clear my hips out, where is my left arm now?
Where is it?
Well, it's at the delivery point, what I just trained you guys to do on Saturday.
which all you got to do for those lead side dominant releasers is just let the puppy go.
Don't squeeze, don't hang on, let her go.
This is one of those things that's mind -blowing for a lot of you because you've always thought to yourself that you had to pull your arms down to that position.
You don't have to, okay?
Nobody in this room, I would assume, is working for Cirque du Soleil and is a contortionist, right?
If I hold my lead arm in this position, I shift my hips left and clear them out.
Look where they are.
All I'm doing from here is just letting her go.
If you didn't get that, stick around.
We'll talk about it a little bit further, right?
So there's two components that are moving your hands and your arms down into delivery.
What are they?
Well, the first one is gravity.
What do I mean by gravity?
Well, if you think about this objectively, right?
The functions of the arms in the golf swing are this, okay?
There's a little bit of elevation.
So from a static address position, My arms can elevate, right?
So my elbows are at the base of my chest.
There's flexion, and there's a little bit of wrist and forearm rotation, and there's a little bit of wrist set.
Now, if you look at this position from face okay, and you look at it from down the line, now watch what happens.
Does that look all right?
So what did I do to get my arms up there?
My arms elevated, they flexed, and the body turned.
So what you have to remember is that When your arms move vertically, what's supporting them?
Your shoulders.
Your shoulders are supporting your arms in that vertical sense.
So when you start down, if you relax your shoulders and arms, the gravity aspect is also going to help move your arms down in front of you.
The other component is what your hips and your legs are doing.
When your hips are going from this 45 degree wound position to 45 degrees open, what is that doing to my torso?
Well, it's pulling it all the way around.
And all of you have your arms attached to your shoulders.
Okay.
And so when your arms are getting worked back out in front of your body and gravity's moving down in there, this is how you create speed.
This is how you get your arms down in front of you.
This is how they are propelled.
That's it.
That's how you make the golf swing much more simple is you do nothing with your small muscles.
Now remember, in order for it to swing that golf club at a hundred miles an hour, 32 pounds of muscle.
I know a lot of you have worked out a lot in your days.
but you don't have 32 pounds of muscle.
You just don't have it in your shoulders and your arms.
You do have it available to you in your biggest surface area muscles, your lats, chunkiest muscles, your glutes, abs, your obliques.
So what your job is, is to get those things engaged.
That's what that pressure shift is all about, is loading your glutes.
That's what that body turn is.
It's loading your abs and your obliques.
That's what we're really trying to focus So all we've done to this point is we've trained our lead arm.
to swing independently from our shoulders.
We've trained our legs and our hips to start working aggressively, right?
Well, not aggressively, but moderate speed, moving into and through a good solid impact position.
Now let's blend them together.
So for those of you at home that want to stand up and work on this with me, I do encourage you to work on this with me because if you are going through the movements and you find that you're struggling with something, maybe you come up with a question that will be, Good for the whole group to hear at the end.
And that's one of the things that I'm going to start with before I go into the rest of the session is.
Don't be afraid to ask questions at the end.
Because even if I've been a kind of a pain in the butt to one of you, or most of you, those questions might be something somebody else is thinking about.
I want you to ask those questions because it helps the rest of the group learn.
Okay, so don't be afraid to ask anything.
There's not a bad question in here.
Okay?
So now, what are we going to do to blend this together?
Well, we're going to do it in two pieces at first, right?
But we're going to go ahead and take our setup position.
Okay, I'm not going to walk through every nut and bolt to the setup.
All right, I'll walk you through that at the end again.
I just want to kind of keep things rolling.
So we're going to get into our setup position.
Our left arm is going to be hanging down freely.
Put your right hand behind your back.
Pressure shift right.
Turn to where your lead arm is parallel to the ground.
Now what I want you to do is I want you to go six, seven, eight, nine with the secret sauce.
And I want you to stop.
And then I want you to let your arm swing past your body.
Two separate pieces.
Why?
Well, because most of you at home are going to do this.
Okay.
Now, what did you see there?
Well, I'm going to answer for you.
If you look really closely, my arm started first.
So my arm starts going this way.
And that momentum and inertia that I created in my left arm, and eventually there's going to be a club there, did what to my body?
Well, it pulled me over there.
And I can't tell you how many freaking golf lessons I've had with people who are like, Well, Chris, I did shift my weight.
I'm like, no, you didn't shift your weight.
Your arm and your golf club pulled you over there.
Super common.
Why?
Well, because guess what?
It is really easy for us to move this golf club around in space with our hands and arms.
It really is.
I can move this thing quickly and I can let my body follow along.
So you have to break these up into two pieces.
Now, I know a lot of you have been around the website for a while.
Excuse me.
You guys have heard the importance of when you post up that your release is happening simultaneously.
I'm not going to argue with that.
That's a great little lesson in physics.
We always want to be working in the exact opposite direction of the golf club.
How many of you at home have seen Kyle Berkshire hit golf balls?
Anybody ever seen it?
He's one of the long drive gurus or long drive guys out there.
Long hair.
If you've ever watched him when he's hitting golf balls.
He's literally flying up on the ground.
He's working away from the ball.
His feet come up off the ground.
He's working this way.
Why?
Because if I'm moving back in this way and the club's going down this way, it's going down there faster.
Now, the fun thing is, is next time you have your kids or your grandkids go out there and give them a club, because they're not really strong through their hands and their arms, they start trying to figure out how to make their arms go faster and their club go faster.
And you start seeing them use their legs and their hips.
I've got a seven-year-old out of France who actually just flew in.
His dad flew him in over here.
I've worked with his dad for a few years, but he brought his seven-year-old in and this kid, I can't make this up.
I can show you guys a video if I want or if you guys want, but I don't know if there's the COPA act or whatever, but I think he would probably approve me for you to see it.
This kid is literally flying up out of the ground.
He's going this way and the club is going down really fast.
Now, he's got a little bit of a flip and he's got a little bit of a posture issue.
I said to him, I said, Rod, are you teaching Etienne ground force?
And he's like, absolutely not.
Kids start to figure that stuff out.
And some adults do as well.
So my point here is that you always want to be working in the opposite direction as a club, okay?
When the left hip is moving back and away, so when you're doing that secret sauce, okay, the club is going to be working down.
When you do drills of this nature, I want you at home to get to this position first.
Why?
Well, because you're.
You have to remember your arm is going to get down there anyways.
If you know you get to this spot, then you know the release is going to happen.
If you don't get to this spot and let's just say your arm is out here and then you get to post up and guess what?
You've now sacrificed a lot of your efficiency rating, and you've moved from your upper body, and that's forced your hands to be more reactive on the way through.
You have to make adjustments for that.
You have to actively manipulate things.
Okay.
So I want you to make sure that when you do these first few reps that you are going to load.
into six o 'clock.
You're going to pressure shift from six, seven, eight, nine.
You're going to help really aggressively move up through there.
Okay.
Left hip gets back and away, or I'm sorry, left butt moves down and back, left arm passes.
Now, once you do, let's just say three or four reps, just like that.
Okay.
Now watch, I'm going to just start moving and blending them together.
Okay.
Okay.
Let's look at it down the line.
Pressure shift.
Okay.
Okay.
Now you can clearly see that my left hip is getting opened up before my hands and arms go through the release.
If you find that you're having a hard time understanding your sequence, then pull the foot off the accelerator, do them in two pieces, right?
So now you have a plan so far, right?
This is one of the things that we've been really kind of harping on for the The last two sessions is understanding how to work through this stuff.
Start out left arm only.
You start out after that, you start adding in some lower body movements with no left arm.
Then you work on them as two separate pieces, but together.
And now you start working to blend them together.
Now, once you become proficient with that, it's time to put the club back in your hands.
Now, I'm both ways on this.
And you guys can comment at the end if you'd like.
I was going to talk to you guys about having the club flipped upside down and doing these reps.
Why would having the club flipped upside down do us some good?
Well, because momentum and inertia is not in the club at this point.
And so you can really focus on getting the sequence right.
And there's a lot of merit to that.
But I also think that when you start moving your hips the way that we want you to, and you keep your tension levels down in your left arm, then you want to be able to feel the weight of the club.
Because honestly, these reps are going to start producing some pretty decent speed for you.
All right.
Not earth shattering speed where you're swinging the club at 95 miles an hour, but enough speed where it's going to start to feel like an athletic golf swing.
OK, so I want you to pick the club up.
And what I would do is I would choke down on the club.
OK, you can get all the way down to the end of the grip if you want.
I choke down on maybe three or four inches.
Takes a little bit of the weight out of the club.
OK, I'm going to hold the club very lightly in the back three fingers of my left hand.
OK, you can have your thumb on the shaft.
You can have your pointer finger touch the shaft as well.
Just remember, your thumb sits behind the shaft as well, and it is very capable of pushing the club head down.
Your job is to keep it as passive as possible, okay?
So now what we're going to do is we're going to do the same thing that we did in that third step, because we're going to work in two separate pieces.
So we're going to pressure shift right.
We're going to turn our body back into nine o 'clock.
Now you can notice here that I've got the club shaft almost perpendicular to the ground, almost.
That would be perpendicular.
I've got it kind of just short of it.
So you're going to have a little bit of wrist set here.
Now, as you start moving from six up to seven, eight, nine, moving the left hip down and back, notice how far down the hand came and go ahead and let it release.
So you're going to go ahead and pressure shift, turn back into nine o'clock.
Okay.
Six, seven, eight, nine, let it release.
Okay.
Turn, pressure shift and turn six, seven, eight, nine, let it release.
Now you saw that last rep that I blended them together.
Not fast.
Okay.
I'm doing these as two separate pieces at first to make sure they're right.
And as I get them proficient, start moving a little bit faster here.
So I'm just going to be quiet for a minute.
Watch you.
I'll let you watch me practice.
Okay.
Okay.
Pressure shift, turn, six, seven, eight, nine, down and back.
Let it release.
Let's look at that from down the line here.
So we're going to pressure shift, turn parallel to the ground.
Six, seven, eight, nine.
Okay.
My arm just kind of relaxed.
I want it out away from my body.
Let it release.
Okay.
Pressure shift.
Nine o'clock.
Six, seven, eight, nine.
See how my hips go back.
Club releases.
Turn.
Okay.
Now.
That's your golf swing.
That right there.
you didn't get it, is your golf swing with the decision of how you're going to release the club.
A couple of things to look out for.
Lead arm parallel to the ground.
When you guys saw me turn my body back, you want to make sure that the lead wrist is kind of in line with your sternum.
You don't want it way back against your chest like this.
Why?
Well, because that's an indicator that you pushed your left arm to that position.
So you want to look at this in the mirror.
You want to make sure that you see your lead wrist kind of in the position of the center of your sternum.
You don't want your lead arm out here.
Why?
Because it's going to require a plane shift or you're going to come down really steep, right?
Remember, if you get it in this spot and you allow your arm to draw, look at your delivery point.
Does that look familiar?
That should look like Saturday, right?
So that's one of the checkpoints now.
Remember, it's when you're moving slowly and you're moving in two pieces, you're going to start feeling some tension in your wrist and your forearm.
You're going to start feeling some tension in your left shoulder because the club is going to be pretty heavy.
As soon as El Matador comes back on the club here, okay, Lamborghini Centenario comes back on the club, things get a little easier because it's going to offer a little bit of support.
Why didn't I bring the right hand on there during those reps?
Because I want you to keep it out of the mix and get the sequence stuff right and also be able to feel the tension-free left arm swing.
Now, For those of you that are going to be trail side dominant releasers, hang tight.
I'm going to demonstrate this as a lead side dominant release because that's what we're looking for for most of you, right?
For some of you, we're going to wait till the end here.
We're going to teach you how to get that on the club and we're going to teach you how to hit the golf ball present.
So for right-handed players, and this is before you start hitting balls, for lead side dominant, okay, we're going to take.
Can you show the sequence with the butt down and back with your back to the camera?
Yeah, I can show you guys my butt.
That's fine.
So hopefully you guys can see me here.
I got a big rear end, so you can't miss this.
For those of you that want me to put a dot on what to watch, here you go.
Okay.
Pressure shift right.
Okay.
Six, seven, eight, nine, down and back.
Okay.
You can probably see my head dropping down just a little bit.
Down and back.
Okay.
Six, seven, eight, nine, down and back.
That's it.
Yeah, thanks, Greg.
Appreciate that.
So, now, bring the troublemaker back to the mix.
How are we going to do it?
We're going to touch this little puppy like we talked about on Saturday.
We're going to do the same things, okay?
Now, I'm going to give you a couple options.
We do like the idea that you can have the right hand come off the club down here at the bottom.
If you find that you're really just disrupting things and your left arm really kind of stalls and you get a lot of flip there, I would prefer, and this is what Axiom is all about, is to give you movement and give you movement that's going to be doing what you're on the golf course to do, right?
And that's to swing the golf club.
So I want you to take your right hand and I want you to touch it with your pointer finger and your thumb.
Okay, we're going to get good setup.
Okay, we're going to pressure shift right.
We're going to turn our body back into nine o'clock.
You can see that I got the club shaft.
Pretty well close to perpendicular to the ground.
Now I'm gonna go to six, seven, eight, nine, down and back.
Look at where I am, okay?
Pretty good spot right here, right?
Okay, and I'm just gonna go ahead and let it release.
Now, when I let it release to the other side, a checkpoint here is to make sure that your head and your chest stay back behind the golf ball, okay?
Your hands and your arms are extended out in front of you, and that your left wrist is fairly flat, okay?
I shouldn't say fairly flat.
You guys are going to take that out of context.
You're all going to show up with a flip like this, okay?
Flat.
So I'll show you up the line.
So we're going to go into nine o'clock, six, seven, eight, nine, tough butt down and back, let it release on through, okay?
Let's look at it from up the line.
I'm sorry, this is down the line.
That was up the line.
It's been one of those days, huh?
Nine o'clock, six, seven, eight, nine.
Okay, I'm down at delivery, just letting her release.
Okay, now, you guys ready to blend it?
Let's do it.
Okay, so we're gonna go to six, seven, eight, nine.
Now what we're gonna do is we're gonna do the whole downswing component as one.
We're gonna aggressively move through six, seven, eight, nine, down and back, and we're letting her release, okay?
So you wanna be able to look at your positions.
Stop and look.
One of my biggest pet peeves is when you guys do a rep, This is what happens.
Go to this nice nine o'clock position, six, seven, eight, nine, and you're all done.
You're like looking around.
And I walk over and I'm like, well, how the heck did you do?
You're like, well, I think I did pretty good.
I'm like, well, how do you know?
You're like, well, I mean, I felt like I did pretty good.
Well, feel versus real, right?
This position over here, I know the golf ball is already long gone.
It's already long gone.
But it's a very good way for both you and I to be able to reverse diagnose where you're moving from.
For instance, if we look over and we see you like this, okay?
Look at where my head and chest is.
Look where it is, okay?
It's my buttons on my shirt are in front of my belt buckle.
How'd they get there?
Well, I actively move from my upper body.
When you actively move from your upper body, what are your arms not doing?
Well, your arms aren't releasing independence, so you're gonna be slowing the club down to a certain degree.
So again, another checkpoint would be, okay, we see the, cup, or I'm sorry, the club up to the sky here.
Look at it at home.
If you're over here like this, what did you not do?
Well, you certainly didn't let your wrist and your forearm rotate.
Where's this golf ball going?
Well, it's going to hit you in the forehead, or if it didn't hit you in the forehead, it's going to go four right.
Tell the people on the right side of the golf course to beware.
Okay?
So you have to look at your positions after impact.
Now, the way that I look at things after impact, and I'm sure Craig does the same thing, and I'm sure Chuck does the same thing, is look at it.
from the ground up.
Why?
Well, if you look at it from the ground up and you see that your hips are open 45 degrees, you've got 90% of your weight underneath your left foot, your left leg is straight in a neutral joint alignment, you have your shoulders slightly open because the club pulled us around in this position, okay?
You have the club parallel to the ground and the toe to the sky, okay?
You've got your wrists and your forearms rotated.
you know that you probably moved pretty good down here to get to that spot.
It's a way for us to reverse diagnose how you're moving.
That's why I always look at people's golf swings, whether you know this or not, is when I'm watching hand and arm path, I will look at your swing with your hands on this side of the body.
I'll look to see if they're here.
I'll look to see if they're there.
I'll look to see if they're here.
And then I'll follow them back to see where they are on this side.
And then I'll go back through to the other side and I'll watch it a little bit longer.
that's a great way for an instructor to see where you're moving from.
And I just gave you guys a little tip at home, right?
If you look at things that are going on post-impact, and then you come back to impact, and then you look at it over to the nine o'clock position, and you look at the stuff that I talked about, lead wrist, where is it going to be at that nine o'clock position?
Well, it's going to be somewhere around your sternum.
Club shaft should be kind of right underneath the right shoulder.
And the delivery point, you guys all know what the delivery point looks like, right?
And then you look at the stuff that's going on post impact and you just keep going back and forth now.
Guess what, you just made me, you made me not important.
Why?
Well, because you know how to look at your golf swing.
Now.
I'm not saying that you guys should all go out there and start doing a lot of your own self -analysis.
Because I have learned in the 19 years of golf instruction that I've done and this is not a knock at you guys.
And we used to have a self-analysis tool on the website.
Because you guys suck at looking at your own golf swings.
You guys are your own worst enemies.
I had a guy yesterday that was in from, where was he from?
The UK.
Sorry if you're in here tonight.
I know he was at boot camp number two.
And he's like, he goes through, I was like, what are you here for?
And he's like, I got all these problems.
He's like, I don't know if I load my right hip.
I went too much secondary axis tilt.
I get this really big flip.
The guy actually loaded his right side beautifully and he had stacked up his left side awesomely.
He just threw the hell out of the golf club with his right arm.
Really, way too hard, way too early.
And he had just this flip at the bottom.
And so I was like, how did you come to this determination?
He's like, Well, I looked at it on camera periodically, but and I was like, Okay, well, would you look at these videos with me and tell me that that's the case?
He's like, I can't, I can't really tell.
He's like, That's what I pay you for, that's again, again.
The whole point is that if I can give you certain checkpoints.
But how you move into and through positions is extremely important.
And there might be a little bit of give and take to this stuff.
So What I just taught you guys to do tonight is the starting point of your practice session.
That's it.
It took me 45 minutes.
I told you we had a lot of stuff to do tonight and not a lot of new info.
The starting point.
Now, for those of you that are going to get frisky and you guys are going to try to hit some golf balls, I love it.
Please try it.
We're going to take a little bit out of We're going to still work on the pressure shift, but we're going to work on small swings and you're going to give yourself benchmarks.
What do I mean by benchmarks?
Well, I'm going to give you an example because I like examples.
I have a guy named Andrew who's out of the West Coast in Oregon.
And he started out working on release drills and working on sequence with me.
And he was, he's like, I just don't want to see my left wrist like this at Impact anymore.
He's like, I don't want to see it.
He's like, I know that I have to be able to get this right in order to be able to play good golf.
So he hits 50 balls a day.
He does a one -to-one ratio and he works in four phases.
So it's phase one is hip high to hip high.
Phase two is chest height.
Phase three is shoulder height.
And then phase four is full swing.
And he has to get 50 out of 50 in his practice session, dead nuts on the center of the face before he goes to the next phase.
And I was like, that's being pretty hard on yourself.
That's being pretty disciplined.
That's not allowing any room for error.
But he said to himself, if I'm going to do this and I'm going to get those reps, I mean, like I might as well strive for the best, right?
I was like more power to you.
I personally.
I don't think I've ever put myself in that sort of pressure cooker.
And so we worked our way up and we got to phase three and I was getting reviews from him that he would send in.
He basically would start off his reviews.
I hit 46 out of 50, 48 out of 50, 49, 46.
Had a couple of sessions where it dropped down just because sometimes people try to fit too much into their practice sessions or they try to do too much.
And you got to think about this stuff as like a bodybuilder, right?
A bodybuilder can't just do chest presses like every day, all day.
They got to give yourself a break.
So he got, I opened, I remember the day I opened up the review and he got 50 out of 50.
And I was like through the moon excited.
And I said, all right, well, it's time to move into phase four, right?
And he said, I'd like to do phase three one more time.
And I couldn't believe it.
I was like, that is super, super disciplined.
And we are still, he and I are still teeter -tottering back and forth between phase three and phase four right now.
And I love this ladder drill because it makes you accountable and it gives you something to strive for.
A lot of you at home don't have the patience to do 50 out of 50, but let's just say it's 10 out of 10.
So I want you to practice starting out real small.
You're going to hit a golf ball.
I want you to work off of ratios.
I like starting out with small ratios, like a one-to-one.
Now, a one-to-one ratio does not mean that's the way it's going to be for the rest of your existence.
If you go and you do a first rep where you take it back, you pressure shift, you're about hip high.
You go to six, seven, eight, nine.
And you let it release on through.
You get it right.
And you can do it pretty proficiently.
So there's my one rep.
Okay?
You go in there and you do this.
Okay?
Now, you look at it on camera.
And those were pretty bad.
That was a pretty bad example.
I'm sorry.
But I wanted to be exaggerated for a second.
You look at those and you see how vastly different they are.
Then what do I want you to do?
Well, I want you to increase your ratios.
I don't want you in a one-to-one.
I want you on a three to one, a five to one.
I've had people up at 20 to one.
This is, again, the discipline that's in red right here that you have to have.
Now, I also want you to use a little rating system for yourself.
I like to use a scale of three.
I was using 10 before, but I think there was just too much discrepancy between what a seven was or an eight was.
I like three being perfect, two being I could do better, and one being I just screwed the pooch on that one.
So when you go through your reps, if you do your first rep and you give yourself a three and you're on a one-to -one ratio, then guess what I want you to do?
I want you to walk in and I want you to hit the ball.
Okay?
Now, when you do this and you hit the golf ball, I only want you guys to look at the swings where you felt like your practice swing was a three and you felt like your golf ball swing was a three.
Okay?
If you feel like when you were.
hitting the golf ball and it wasn't a three.
And don't use the golf ball as feedback right away.
But you hit a shot and you didn't give yourself a three because something fell out of sorts.
Then start your process is over.
Now, if you give yourself a three, I want you to go look at your camera, your live view cameras, your phone, whatever it is you're recording yourself with.
And I want you to look at number one, the practice swing and number two, the golf ball swing.
And I want you to look to see how close they are.
If they're really close and you're in the position that you've seen me demonstrating all freaking camp long.
Like your practice swing is right here.
You move through it like that.
Your golf ball swing is in the same spot.
You got the club shaft leaning forward.
Guess what?
You're ready to continue on.
Okay.
You're ready to start building on that.
Get a few more reps in.
Try to hit your benchmark.
Go into phase two.
Phase two.
And you can play around with this.
I don't want you to get stuck thinking about, okay, I got to take it back and hit butt.
Go back a little bit further.
Big deal.
Fine.
Okay.
You just need to think about it in phases.
Some people like to work in three phases where they do hip high, chest high, and full swing.
Now, let's just say, whoops, let's just say I'm now moved my way into phase three, full nine o'clock, okay?
And I get some good practice reps okay?
And I'm working on like, let's just say a two to one ratio.
And I find that I'm not hitting the golf ball well.
I'm not hitting it solid.
I'm not hitting it in the direction that it's supposed to be.
Then guess what I want you to do?
Pull yourself back down.
Start small, build up.
Now, I want you at home when you get to the point where you're hitting golf balls to use the golf ball as feedback.
You should be able to know at this point if you're hitting the center of the face, okay?
You should be able to feel it.
That's what the compression drills are all about, baby.
Watch that video.
You'll feel it, right?
You'll hear the sound.
Okay.
You start small.
If you're hitting these little small shots that are going 30 and 40 yards, it might feel stupid.
And people at the range might be like, why is that jerk over there wasting all his money on hitting the little 30 yard shots?
You're like, ha ha.
That's why you're going to shoot 140.
And I'm going to go out there and shoot 75.
Right?
So you take, you do these things, you feel the compression, but you also look at the shot chain.
Now, for those of you that need to learn how to identify what some of the faults are, well, You got to look at it through the ball flight.
If the ball flight's up in the air, you know the club face was adding loft to it.
If the face was open and the balls went out to the right, you know that you didn't let the club release, right?
So those are things that you're going to have to look out for.
We know as golf instructors pretty much through ball flight what you were doing wrong.
We need that feedback from you.
So if you're going to use the swing review process moving forward in this, which I would always suggest that you do, tell us what the misses are.
Don't just show us the good stuff.
Show us the bad stuff.
That's what I open up reviews in the morning.
I expect my students to show me the bad stuff.
They can show me some good stuff if they want to, but show me the bad.
Why?
Because this helps us as golf instructors help you identify what your fault is.
If I can help you identify what your fault is and you can go out on the range and now you've got this really big arsenal.
You've got this big toolbox of knowing, okay, when I hit it a little bit fat, I know I did this.
And I hit it a little bit thin.
I know I did this.
That is very player specific.
Now I know somebody in the chat is probably, what if I hit it back?
What if I hit a thing?
I don't know.
You know how many things that can cause a fat or a thin shot?
You know how many things can cause a toe strike?
You know how many things can cause a heel strike?
You know how many variables can cause this stuff to get out of line when you look at it down the fairway?
So you want to start identifying what your problems are.
You have to use a camera.
If you don't know how to look for the stuff that I've talked about where delivery point to impact and then post delivery, then use an instructor.
There's no ifs, ands, or buts about it.
Use it because that's what we're trained to do.
We're here to help you, okay?
That's why I said to you guys at the start of camp that this is not just a wham, bam, thank you, man, done in two weeks and you guys are kicked out the door.
Some of you, we're gonna spread your wings.
You're gonna be able to fly away and go do some good things.
Some of you are gonna need a little bit more handholding.
Some of you are gonna wanna process and go out there and start working through this stuff.
Go out there and become your own golfer.
and look at it and work through these drills just like I outlined.
There shouldn't be a question tonight on how to practice this stuff.
I'm going to walk you through it here again in just a moment.
But I wanted to get the nuts and bolts of it and teach you guys that this stuff is a living document.
Learn the movements.
Separate them.
Put them together.
Add the club.
Get proficient.
Put the golf ball in there and don't be afraid, right?
If you put the golf ball in there, you have a foam ball, a plastic ball.
I just hit it at my glass door over here.
It came back.
But I can tell you right now, because I felt like my movements were good, and I know the golf ball reacted, and I know that if we were to go back and look at that on camera, that I had the shaft leaning forward and the club face square, which is exactly what I said to you guys on Tuesday or Saturday.
Saturday was the most important part of golf.
I said it.
You got the shaft leaning forward.
You got the club face square.
You got a fighting chance to compress the golf ball.
Now, I know that I said to you guys, to your right-handed players, Right-hand dominant people, I would demonstrate some right-hand dominant releases.
Now, I'm going to do this real fast because there's not anything different as far as the pressure shift and the arm position here coming down.
You are going to learn on Saturday the clockwise movement with your arms.
Much to my chagrin, I will put it in there for you guys at home because it is a good way for you guys to overcome faults.
With swinging over the top or not being able to feel the shallowness of the hands and arms on the way down.
I will teach that to you, okay?
I'm not going to just.
Put you guys in the back of the bus, okay?
But I'm gonna teach you guys what you should be feeling from a nine to three standpoint here.
Now, remember, when you move from six o'clock through seven, eight, nine, and you're going down and back with your left hip, you need to think about your body as being like a three-stage rocket booster.
The hips are first, the shoulders are gonna turn open, and the arms are gonna extend down the target line, all right?
You're gonna try to get the club to feel like it's extending down the target line.
What I would do specifically, Is, I would look at trying to get yourself into that position first.
Kind of like the tape drill, so for those of you that haven't seen it, go back in the slides, click on it the tape drills on here.
Put yourself in the position post impact so you can feel your hips open, you can feel your chest kind of turned open.
You can see that I have a whole lot less side bend, right?
This is going to be the position that you're going to feel okay.
So now what we're going to do is we're going to go to nine So you're gonna try to hold the face square longer.
Okay, so you're still doing it in pieces.
Okay, now you're gonna start trying to blend them together.
Six, seven, eight, nine.
Okay, so you can see that the difference with the release, and I'll show you down the line here in a moment.
If you look at my head and my chest with a lead side dominant release, you see how my head and chest stay back a little bit more?
My buttons are behind my belt buckle.
Got a lot more side bend, where a trail side dominant release.
You see how I'm a little bit more on top of one another.
Okay, the club is extending down the target line a little bit longer, okay, so down the line, what it looks like?
Okay, and then returning the shoulders and extending the club down the target line.
So it doesn't look that much different from a down the line perspective.
Okay, it looks more different from from face on.
Yes, the club will look like it's doing some different things.
But again, the face always has to be rotating and the hand and arm path has to be a little bit to the left.
You can't have things stay straight down the line.
So you want to turn your chest after your hips turn.
You want to open your chest up and you want to extend your hands and arms through contact down the line.
Okay, remember, this is happening very quickly.
Your shoulder turn at that point is the primary square of the club face through the point of contact.
You're trying to fight off excessive rotation by feeling like you're extending the hands and arms down the target line.
Does this make sense?
Because if you're turning your shoulders and you're releasing it like a lead side dominant release, then the hands and arms are going to go left.
You're going to flip the face over and then you are going to hit it left of the planet.
So yes, Paul, I'm talking about a trail side release here.
So hips first, shoulders open, extend the arms down the target line.
I'm wore out.
I don't know about you guys.
I'm going to demonstrate this all from beginning to end in super warp speed because we are at an hour and I'm like, I'm winded.
I know you guys are probably trying to catch up because I talk really fast, but whole point is being able to slowly stack pieces in as you become comfortable.
And as you become aware of movements, that's it.
The golf club and the golf ball are all very, very reactive to what you're doing, right?
It's all very, it's everything that you do with the golf club.
And this is why you don't hear us talk about swing plane and yada.
Swing plane, you'll hear us talk about from an instructional standpoint.
The swing plane is important, but it's consequential.
Everything we do with that golf club is going to be a byproduct of how we move our body.
Now, I said it to you guys before.
Some of you at home don't have awareness of your body.
I'm one of those people.
So my practice sessions have to be a lot slower than somebody that's got crazy kinesthetic awareness.
I have to work in these very broken up pieces for extended periods of time.
So I've got to do a lot of left arm only swings just to feel my left arm swinging freely under my left shoulder.
Then I've got to do reps where I focus on just my lower half.
Okay.
Six o'clock, seven, eight, nine.
Okay.
Now you're seeing me do these faster than you at home.
Why?
Well, because it's my job, right?
I've been doing this for a while.
I've played golf.
I'm actually a pretty decent golfer, believe it or not.
Okay.
So how are we going to practice it is isolating, stacking.
Left arm first, focus on your lower body, getting that stuff right, blending them together, but in two separate pieces.
and then slowly starting to get the swing into nine o'clock to three o'clock, bringing the club back in, letting the club follow along with your movements, getting the sequence buttoned up, getting the release buttoned up.
Then when you start hitting golf balls, when you bring the golf ball into the mix, do not go to nine to three right away.
If I see you go to nine to three, that just tells me that you don't care about what I'm saying to you and you want to continue to flip or scoop at it.
Stop doing that.
Start small.
Little baby swings.
Little baby swings when the ball is there.
The ball adds a distraction.
Now, some of you are like, well, how, Chris, am I going to get 6, 7, 8, 9 to get my hips open and be able to release the club in time?
Of course you can.
You just have to focus here first and keep your tension levels light.
Now, when you start working your way up, look at your positions.
Look at your hand position at 9 o'clock.
Look at your hand position at delivery point.
I talked to you guys about those positions.
I'm not going to go back through all those.
Look at your position at impact.
Look at your position post-impact.
Check those things, okay?
If you're not looking at those things, then you're missing the first rule of engagement I gave you guys last Tuesday.
The first rule of engagement was is that you must use a mirror or you must use a camera if you want to stop sucking at golf, right?
I told you that.
Now, if you don't know what you're looking for, then send it in for a review because I don't know if you guys can tell this or not.
I'm very passionate about helping you guys play this game.
I'm very passionate.
Some of you have said it.
So when I'm telling you guys that if you just stay committed to the process and you stay disciplined and you utilize the resources that we have in place and stop feeling like you're alone in this process, Then I will guarantee every one of you that is sitting in this room tonight, or anybody that's coming back to watch the replay, will get success with this stuff.
But it's all about how you process the information, how you take that information, and how you start small and stack the pieces together slowly.
Stack them together.
Okay.
Bring the speed in late and then slowly start bringing the golf ball back in there and have some fun with it.
This stuff is supposed to be fun.
Don't let it drive you crazy.
If it's driving you crazy, then you're practicing it wrong or you're not utilizing the resources.
So yes, that is my big kick in your ass tonight because I want you guys when this camp is done to come back to me and say, I got some awesome results.
And if you didn't get awesome results, I want to hear it because I want you to tell me why you didn't get awesome results.
I'm not going to beat you up for it.
I'm going to help you get the results that you're looking for.
So now, I know that that was a jam-packed session.
And I know you're probably like, well, that was it.
I'm not gonna, you're not gonna walk me through the hand -holding experience.
Please, you guys know how to do this stuff.
It's all the movements I've taught you at this point, separately, bringing them back together with a club and the ball, okay?
So for those of you that are ready to get out of here and ready to go ahead and work on things, remember 100 reps a day is pretty good, okay?
Get to your working reps.
If you do 100 working reps, at a full nine to three swing without a ball, but it's blended together and you know that you're releasing the club properly, whether it's lead side or trail side, that's a big win, okay?
You don't need to add the golf ball right now.
You can add it in Saturday or beyond Saturday, okay?
Getting as many reps as you can with the proper movements, the proper synchronization of these movements is key.
So if you need to take off, enjoy the rest of your evening.
Thank you guys so much for coming out tonight.
I really do appreciate you guys taking time to be with me.
Hopefully you guys aren't in a tizzy.
Like, what the hell did Chris just do?
Hopefully you were able to get all the information you're looking for.
For those of you that want to stick around and ask some Q&A, let's do it, right?
I will stick around as long as I need to to make sure that the information's into your brain within reason, right?
Had a long day.
So hopefully you guys had a wonderful day.
So I see, when extend down the target line, I have a hard time to release the club.
To the left, I hold off the club face.
I have a hard time to release the club to the left, hold off the club face.
You're not trying to release the club to the left.
The hands and arms will work left, okay?
So if you watch from here to impact, post impact, if you follow my hands, they work on a very gradual arc, okay?
If your hands come from here, To here and they go out like this.
You're gonna either hit a block or very dependent on what you're doing, the face, you're gonna hit a quick hook.
Okay, hand and arm path does play a very important role.
It's gonna be working on a very gradual arc.
Okay, it has to, okay, if you don't, then you have to actively manipulate the face at that point, okay, when you start manipulating the face.
And you start timing up a flip, or or whatever it might be, golf is not as enjoyable.
I used to time up a flip myself.
I would get the club in delivery, where I would come in a little bit flat, And I would flip it over and I would hit a draw.
That turned into a big hook.
And you don't want to be four or five under par coming up 16 and hit a quick one out of play.
Okay.
So is there a way you know that the club is in alignment with when you were gripping it initially?
Is there a way that you know the club is in alignment when you were gripping it initially?
Yeah.
So, I mean, obviously what you're looking for is you want, I don't know if you can see it because of the two blue buttons that are on the bottom.
When the club is sold on the ground, you want the bottom groove to be coming back and be perpendicular to the foot line.
That's a good way to check the club face.
And then you just want to go ahead and get your grip set up here to where you have that V up towards your right ear.
So hopefully that answers your question.
Does the right elbow lead the downswing from underhand inside position?
So this is a great question.
I like this question because this is actually a very common instructional technique.
where I actually talk about getting the right arm to help carry the lag angle in front.
The right arm is, we call it the governor of width going back, and I call it the carrier of lag on the way down.
It is, at this point, a passive conduit that's going to be transferring energy from your body for you.
So what I mean there is this.
If I take the club out of here, and I flex my arm to 90 degrees, and I have a little bit of wrist flexion here, a little bit of a set, when I turn my body, and I shift my hips left, now this angle is going to start to move out of whack, right?
You can actively use that at some point, like the throw the ball drill, or you can just let those angles deplete.
So it's not a movement like tucking it in is one of the movements that you have to do.
Now, I know Chuck recently did do a webinar on talking about the right elbow in the clockwise circle.
And again, those sorts of feels or those sorts of things are going to be geared towards a specific kind of person, right?
But lag.
is not one of these mythical creatures, and delivery points aren't these mythical creatures, because I just talked to you guys about this in the middle part of the session, is if I go up to the top of my swing, okay, I'm gonna try to hold my hands and arms right here.
Anybody think this is a bad position?
Okay, I'm gonna shift my hips left, I'm gonna clear them out.
Where are my hands?
Where's my right arm?
I'll turn, it's right here.
They came from that position up there, down in front of the body.
I didn't do anything with my right arm.
I didn't do anything with my left arm.
I just chilled them out.
If you're having to work on some sort of active manipulation or trying to move your right arm into space, it's probably an instructional technique that we're using to help you overcome things, right?
I do it on a day-to-day basis.
Okay, great question though.
Jeremy, so amazing job as always.
I'm still having trouble getting 90% of my weight on my right foot on the back.
So it's driving me crazy.
The only thing I've tried is wearing a clown.
Uh-oh.
clown shoes.
And I'm assessing too much about that.
Thanks again.
Okay.
So first off, thank you for the comment.
As far as getting 90% of your weight to your trail side, when you make this initial pressure shift, okay, you watch my head and my chest, it's moving a little bit, right?
I'm allowing my head and my chest to move a little bit.
So I've been feeling about 70% of my weight underneath my right leg.
When I turn my body, because I have axis tilt here, Now this pressure is building upwards of 90%.
So there's probably a good chance that either A, you're not letting your body move.
You're like locked out on your left leg, okay?
So a lot of times people will try to shift and they lock this left leg out, okay?
It restricts the pelvis, right?
Or they take their hips and they do this, right?
So you shift your hips right and your upper body leans back in the other direction.
Think about Henrik Stenson, right?
Has anybody ever seen him hit golf balls?
He's a freaking maniac, okay?
If you watch his body, he goes like this.
He sits on his right side, his whole body moves.
That's a little excessive than what we would teach.
So you just need to feel freed up.
Like when you're pressure shifting, if you watch the way I'm doing it, I'm not locking my chest and my head still.
I'm letting things move.
Okay, movement is fine.
Okay, if you're moving too far off the ball from here, it's either excessive lateral movement from the hips or you're turning too flat from lead side push.
Okay, so think about the pressure shift.
allowing your body to move and then stabilize and just pull the right shoulder back and you feel the pressure increase on that side.
So Don says, I want to ask this correctly, but I fight coming over the top and had for years and forcing my swing with my right shoulder.
So letting the left arm move independently along with the seven, eight, nine shifts should all be upper body effort movements, so to speak, right?
So letting the left arm move independently along with the seven, eight, nine shifts should be, yeah, exactly.
So that's a really, really great question, Don.
So if you think about the golf swing like this, kind of a very broken down way, right?
I have my left arm just swinging freely, like from a release, right?
And then I take, and I want this arm to go faster.
Well, I'm going to add shift and body turn, right?
And so my arm is working independent from any other movement.
Now, I'm not telling you to swing your arm, but you have to remember that when you turn your body and you get to a full back swing position, and your arm is up, if I did nothing, I'd move my hips or didn't move my shoulders.
And turn the muscles off my shoulder, my arms coming down right, so that starts that independent movement.
So if you did that with aggressively shifting your hips now, you make speed with it, so that's a great way to kind of think about it, for sure.
Arms moving independently from the from the chest.
Yes, your hips are helping propel that, your shoulders are getting pulled around, which is helping move your arms back out in front of you.
Does that make sense?
I need some water, I'm like foaming out of the mouth right now.
All right, so it looks like Craig is busting a move on these.
Is there a proper way to practice webinar scheduled?
I don't know if I understand.
Is there a proper way to practice webinar scheduled?
Don't know if I understand the question.
Proper way can be subjective.
Following kind of the pathway that I outlined for you is a good way to do it.
But being able to adjust.
Right, so some people are going to be able to move through this stuff pretty quickly.
Some people are going to be still working on trying to get the lower body stuff, and some people are still going to be working on the release.
So it's all very, it's all player dependent.
But I would, if you think about this as kind of a a blown up, or actually, I'm sorry.
Like a condensed down sketch of what we're trying to do right?
If I had three hours to sit here and teach you guys how to practice, right?
I would sit here and do it for three hours.
But nobody here in this room wants to sit here and watch me practice for three hours.
If you do, then we can think about adding that as a webinar down the road.
But the way that I practice is very much the way that I would expect you guys to practice.
This is exactly how I taught you.
If I'm working on trying to perfect my sequence and I'm trying to get the release to be as free-flowing as we want it to, and I would start doing those two things separate, blended together without a club, I would spend 30 or 40 minutes doing a bunch of reps.
I would probably 100, 150 reps without the golf club.
And then I would put the club in there, break them apart, put them together.
I would look at it on camera.
I would be doing sets.
And then at that point, I would be deciding if I'm going to try to add the golf ball back in the mix.
But if you look at the history of golf and the only player that you've ever seen make remarkable changes, okay, you've seen Tiger Woods make remarkable changes, right?
And the story is that you watch him go out there and make a change and he does practice reps for 45 minutes and whatever he's working on, he hits one ball.
does it again, and then he's out of there, right?
So he knows how to practice this stuff.
So hopefully that in a roundabout way answered your question.
Homemade chicken soup is calling.
Alan, I will bring the soup recipe, but can you please address my questions?
I'm struggling with them.
Thanks in advance.
Great job tonight.
Kenneth C.
So Kenneth, I'm sorry if I missed your question.
So for trail hand dominant swings, when videotaping your swing down the line, should the club be at the angle of the trail?
So for trail hand dominant swing, when the videotaping your swing down the line, should the club be at an angle of the trail forearm when the trail arm is in the downswing just before impact?
Your delivery point's not going to change, okay?
I actually said that at the start of the session, Mr.
Kenneth C.
I said that your lead arm position is going to be the same spot.
Your delivery point is going to be the same spot.
You're still going to have the same amount of lag.
You're still going to make sure that you don't have the club outside your hands.
If you're talking about the slot position right here, Which is my least favorite term in golf history, because it's bastardized and people just don't understand that.
The wrist function can actually give you optical illusion on that stuff.
So the club position is going to be the same exact position.
Now, when you start moving from the other side to the other, the big difference is how your shoulders are going to look through impact.
So you see how my shoulders are turned open and the club is extending where a lead side dominant release here is going to look.
Like this.
Okay.
Pretty vast difference in the way the body looks.
Right.
So I'm not trying to, so listen, folks, the way that these comments work is I don't have a mouse over here.
So if I miss questions, I can't keep going.
They just copy and paste them.
All right.
I'm not going to, I'm not trying to miss anybody's questions.
Okay.
I promise you trying to answer everybody's questions.
Okay.
So Kenneth, hopefully that answered your question there.
So why don't we do this?
Because I've missed a lot of questions, and I think Craig has answered a lot of questions, for those of you that have missed, or I've missed your questions, please go up and copy and paste, bring it on, and let me answer some things here.
So, looks like Craig is kicking some butt and taking names.
That's because, Craig, you're a stud.
Craig's a great, great help in these things.
You're awesome, Craig.
You know what?
You should have a good old -fashioned night for all the hard work you do, bud.
Anybody got any questions that I haven't answered?
So if you have asked a question and I haven't answered it, please copy and paste it so I can answer it because I don't want to miss anybody because that is not acceptable from my side.
Anybody?
Mueller.
Did I bore everybody to sleep?
Am I still on?
Hello.
All right.
So I guess that's a good thing.
I guess the questions have wound down to the point where you guys are all going to go out and practice.
Now, I will say this.
You guys have been a very, very awesome audience because number one, you can tell by the questions that you guys ask.
Number two, we can see it through the video reviews.
We've been able to see quite a few of you.
Paul O, I owe you a swing review, so you're going to be on the hook with me at the completion of camp.
All right.
So nice, Craig.
Let's do it.
So all right.
So sorry.
The trail hand dominant swings during the transition.
The first move, throw the trail hand and let the body react.
Body first and then throw.
No.
So the body is going to be turning through contact as you're extending the arm down.
So if you look, so the hips turn.
Okay.
You're going to start.
So my arm's in delivery.
You're going to be turning and extending down the target line.
Okay.
I should.
I should have clarified that, right?
So when you get to delivery, you're turning and extending, right?
So hopefully that gives you the kind of the, it's a three-stage rocket booster, hips, shoulders, arm.
And the shoulders and arms are kind of working together.
It's a pretty fast sequence, right?
There's the tape drill on the website.
Chuck demonstrates that and he gives you a really, really good sort of drill that you can use at home.
And you can kind of see your way through it.
If you don't get that stuff answered, Kenneth.
Come back in the next session and I will talk to you specifically about it.
Because I actually did at some point in my life use a lot of my right side, and that's when I was hitting a lot more cuts.
And there is some merit to being able to hit a cut at times, right?
But again, the big difference is that it's going to be more of a later style release of the arms, right?
Your arms are going to be kind of working to try to hang on for a little bit and you're extending down the target line.
So, yep.
Sean P.
, thank you very much.
I think you're in New Zealand, so thank you for joining us.
I think it's sometime in the morning your time, so thank you for joining us.
Do these principle applies to short game?
Great question, so yes.
So short game, I have a very different spin when it comes to short game.
People ask me all the time what technique I advocate.
I've studied a lot of stuff that's out there.
We have a lot of great short game videos on the website.
The Axiom stuff, you can definitely, you can certainly use the footwork.
You can certainly use the release stuff.
I technically, I don't use a lot of wrist and forearm rotation with my chipping and pitching.
I like to hold some of that off.
But again, that's going to be very dependent on the shot that I'm facing.
But you can certainly use the left arm or the trail arm stuff that we've talked about.
You can certainly use this stuff synced up.
You may want to go to a little bit more of a narrow base and play around with it.
But I certainly try to take a little bit more of my hands out of it because I've just been able to develop my feel with a little bit more body turn.
Um, and that's again, something that I can't teach to people, right?
So when I take my club back, I set my wrist and I turn a little bit more through the shot.
So I hang onto it a fraction longer, but I'm always with short game.
I'm always manipulating the left wrist because short game, you got to understand pitches shaft in the face angle and how they either work with each other or against each other.
And so you're always trying to adapt because there's no short game shot on the golf course.
That's the same.
Okay.
So 3 17 PM.
I'm going to learn time differences at some point in my life.
All right.
So it looks like we're getting quiet.
A few people have checked off.
Thank you, Richard.
I really appreciate it.
Any other final questions?
So I knew the driver question was coming.
I will save the driver question for Saturday because we're going to be in full swings.
Okay.
So I would address it now, but.
I'll tell you a funny story.
Well, you guys are brewing up your last questions and Craig's pouring himself a scotch.
Okay.
So we used to be over at the Ritz Carlton for our private instruction and every year they have the father son championship.
And so there's a lot of hoopla.
There's a lot of setup that goes on there.
And where we, where we teach is, is the back of the range.
And if, so if you imagine I'm on the back of the range, looking this way on the left-hand side is 18 and there's usually a VIP tent.
It's on the left-hand side about 100 yards down, kind of in the trees, but off the side of the fairway.
So it's between the range and the 18th tee.
And so this guy, so it's tournament week.
So it's Sunday, and I'm out there.
And for some reason, I always say that I'm never going to book lessons when that tournament's going on because it's distracting for my students, number one, and it's very hard to get them credentials to get in the parking lot.
And so this guy has the best lesson with me.
Like, he hits a golf ball really good.
We get a lot of productivity.
And he's like, at the end of the session, he's like, Chris, can I hit a couple drivers?
And I'm like, okay.
So he tees it up.
And the first ball he hits, and it is packed, like full-blown packed out there.
The first ball he hits is just this violent snap hook into the VIP tent.
You hear people screaming.
The ball was just rattling around.
And I looked at him.
I was like, I didn't know he had a snap hook in the back.
And I'm like, get in the car.
So people are just like going crazy.
That's my driver story, with people always asking, because that's one of the things that people ask at every single golf lesson is that I want to hit my driver with him.
By all means, hit your driver.
All right.
So looks like we are all done tonight.
So thank you guys very much.
will you touch on maintaining lag with wrist in relationship to 6, 7, 8, and where the hands and arms would be?
Great question.
So 6, 7, 8, 9.
Think about what's happening from 6 o'clock.
So let's just demonstrate this.
from a lead arm parallel to the ground position, right?
Six o'clock, seven, eight, nine, my hips are doing what?
Well, my hips are moving left and that down and back is moving the hip into a post-up position.
At that same time, the release is happening.
So your job is to basically just preserve this lag angle, right?
If you're just doing very little with your wrist, you don't have any active movement from the right arm or you're not pushing on the shaft of the left arm.
then lag preservation happens automatically.
Again, it's not a mythical creature, okay?
So when you get into this spot, if you think about it, okay, and I shift my hips left and clear them out, right?
So that's the 6, 7, 8, 9 movement, right?
So this is happening simultaneously as I'm letting it go.
6, 7, 8, 9, you're letting it release.
So we're not ever hitting those positions in the swing.
We're moving through them.
And so what you want to just do is just try to remember, do as little as with your arms as you possibly can.
Just set it.
Forget it.
Let it come down.
Let it go.
I just sound like Ron Popeil.
Set it and forget it.
All right.
So should I actively hold the wrist back feeling tension?
So listen, tension is not necessarily a great thing, but there's going to be a little bit here.
So when I set the club, so again, I'm using lead arm parallel to the ground.
There's a little bit of support here.
I'm not death gripping it.
I'm just supporting the club.
Okay.
You don't want to be ramrod tense, okay?
So when you move to this spot, you just want to feel supple.
You don't want to feel like it's flying out of your hands and you don't want to feel like you've got a whole lot of control.
Just allow a little bit of suppleness to it, okay?
All right, guys, I'm getting out of here.
Hopefully you guys have a wonderful rest of your night.
Saturday, come ready to rock and roll.
We will be putting this all together.
I'll be finishing off the swing, but we will be making sure that every single person that's in this camp, has their plan and their way to practice this stuff.
No ifs, ands, or buts about All right.
So hope you guys have a great rest of your night.
Take care.
We'll see you on Saturday.
Thanks, Todd.
Thank you, Steve.
Enjoy your night, guys.


